Route Planning: Your First Trip
A very basic one way trip using EVTO.
The Big Picture
In this tutorial we are going to describe both the settings of the app and car features and then create a very simple basic one way trip. The trip will include an auto charging stop and one additional manually added waypoint to demonstrate both capabilities. We will be using a Tesla Model 3 as our example car but you can easily change the car type for your own model and cars features if you wish. The charging stops may be different based on the model of car and battery size of course.
For illustrative purposes this tutorial will cover:
- Review the Settings panel
- Review the My Cars panel and associative features
- Create the trip
- Modify the destination arrival state of charge
- Add a manual waypoint
- Review the main app features
- Review the trip (segment) details
Some of the terminology used in this tutorial and the EV world may be new to you. We have created a special webpage to help you understand these terms and concepts.
1. EVTO Settings
In this first step we will review the settings of the EVTO application. You were prompted for these when the app was installed but now is a good time to review what each setting means.
Note: EVTO has a rich set of help for each dialog and menu. Just select the (?) icon on the dialog or Help at the bottom of any menu. You can also view a consolidated help for the app from this webpage.
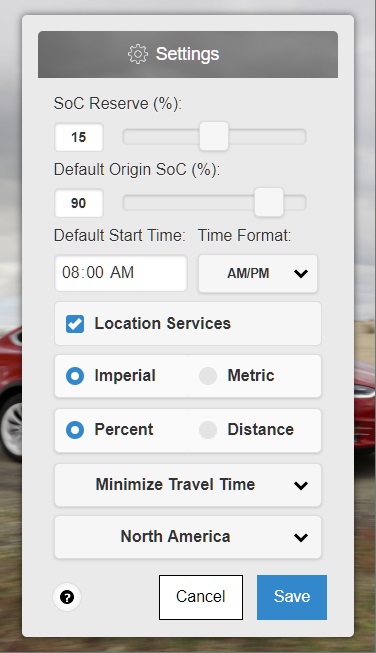
The EVTO Settings Dialog
- Select Settings from the EVTO main menu.
- SoC Reserve (%): 15%. This will set the default target value for arriving at waypoints and charging stops.
- Default Origin SoC (%): 90%. This will set the default value for new trips or new segments at a charging origin.
- Default Start Time: 08:00 AM. Sets the new trip or new segment default start time.
- Time Format: AM/PM. You can leave this as is or set it to a 24 hour display.
- Location Services: Check to have EVTO use your devices current location for origins or displaying on map.
- Choose between Imperial or Metric units. This tutorial will use Imperial units.
- Choose between Percent or Distance for state of charge (SoC) displays. This tutorial will use percent displays.
- Minimize Travel Time: EVTO will aim for the overall least time for the trip.
- Region: Used to display chargers and charging information. For this tutorial we will use North America. If you are not in North America don’t forget to switch this to your region after you have completed the tutorial.
- Touch Save.
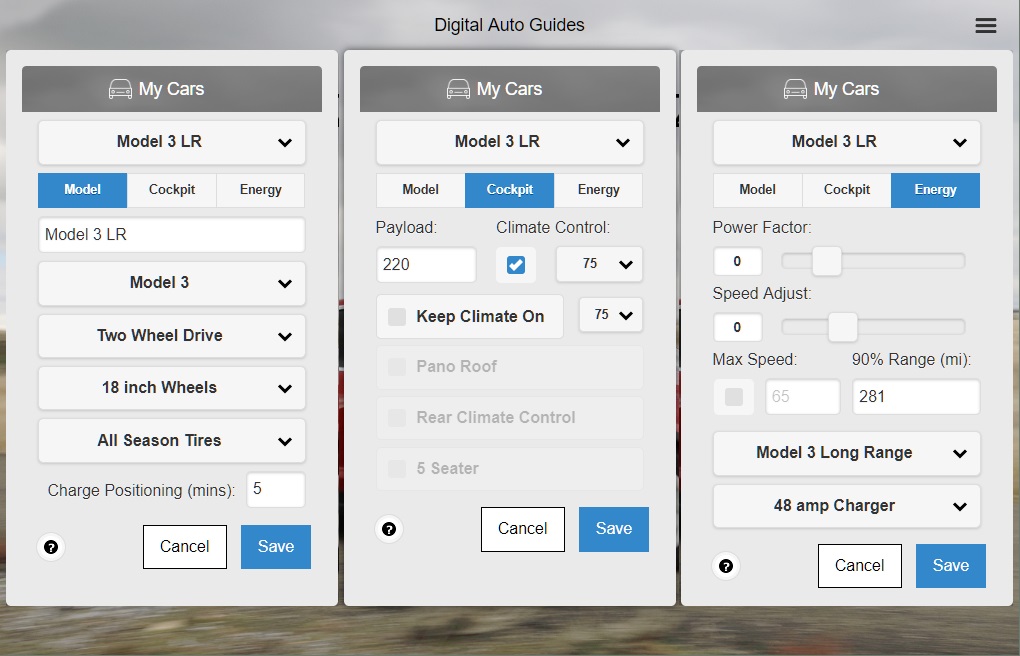
My Cars dialog with it’s three tabs
2: My Cars
In the Settings panel we configured features that were common across all car types. Because subscription users of EVTO can have multiple cars defined (different models and/or different uses for the same model – i.e. regular and towing), EVTO uses the My Cars dialog to support these requirements.
- Select My Cars from the main menu.
- The top pull down chooses the car profile in use.
- Verify you are on the Model tab (it’s blue).
- The next field is the name of your car, but don’t set this yet.
- Choose the Model 3 in the pull down. The car name will default to My Model 3.
- Select Two Wheel Drive.
- Select 18 inch Wheels.
- Select All Season Tires.
- Now select the Cockpit tab.
- Payload: Enter or verify 220. This is the total weight of any item placed in the car or towed by the car, including passengers and luggage.
- Climate Control: Verify the box is checked and the number is 75. This is the default cabin temperature of the car.
- Keep Climate On: Verify the box is unchecked.
- Now select the Energy tab.
- Power Factor: Leave at 0. See the help for more information about this control.
- Speed Adjust: Leave at 0. See the help for more information about this control.
- Max Speed: Leave unchecked.
- 90% Range: Leave as is. This is where you adjust for battery loss over the life of the car. See the help for more information.
- Select Model 3 Long Range for the battery type.
- Select 48 amp Charger.
- Select Save to save this car profile.
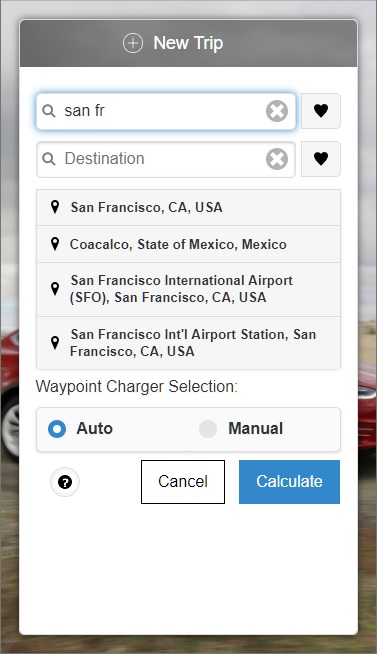
The New Trip dialog defining and choosing the origin
3. New Trip
We are now ready to plan our first trip. This will be a day trip down the interior of California using Interstate 5, from San Francisco to the Disneyland Resort in Anaheim, CA.
- Select Plan a Trip from the main menu. The background will change to a map and the New Trip dialog will appear.
- Do not change the Destination Charger Filter. This is where you could have EVTO provide you a Tesla charging location (supercharger or destination charger) as either the origin or destination.
- In the top input box labeled My Location (origin) type: san fr. Choose San Francisco, CA, USA from the list.
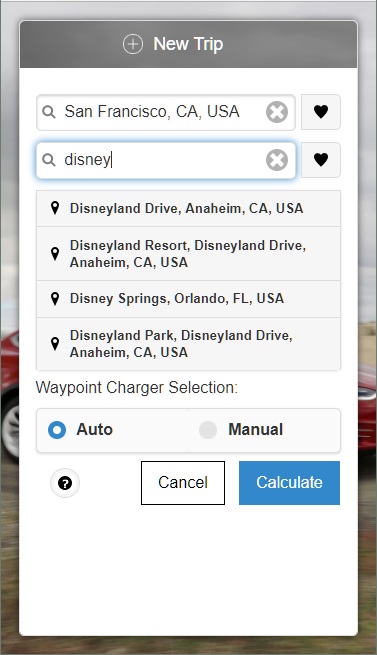
New Trip dialog showing the input of the destination.
- In the second from the top input box type: disney. Choose Disneyland Resort, Disneyland Drive, Anaheim, CA, USA from the list.
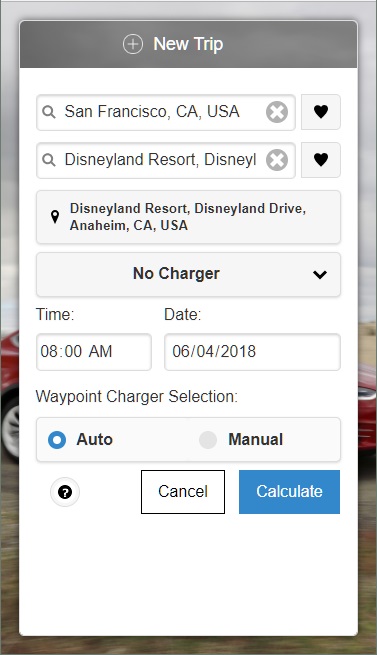
Completing the New Trip dialog.
- Leave the No Charger drop down alone. This is where you would tell EVTO that your destination has a charger and select the charger type.
- Time: This is the default time you created in Settings but can be changed if need. For now leave it alone.
- Date: 06/04/2018. This will normally be the next day unless the current time is prior to the default start time. To achieve the same results please enter the time shown here or in your time format.
- Verify the Auto radio choice is selected in the Waypoint Charger Selection. In this case EVTO will create the trip and automatically determine and place the ideal charger(s). If you chose Manual, EVTO would not add chargers at trip creation.
- Touch Calculate. In a few moments your new trip route will display along with a charging stop.
Note: EVTO uses weather forecasts in determining the energy usage en route. If the weather is different from one hour to another it can dramatically change your energy consumption and therefore result in a different set of chargers and possibly routing, to be chosen.
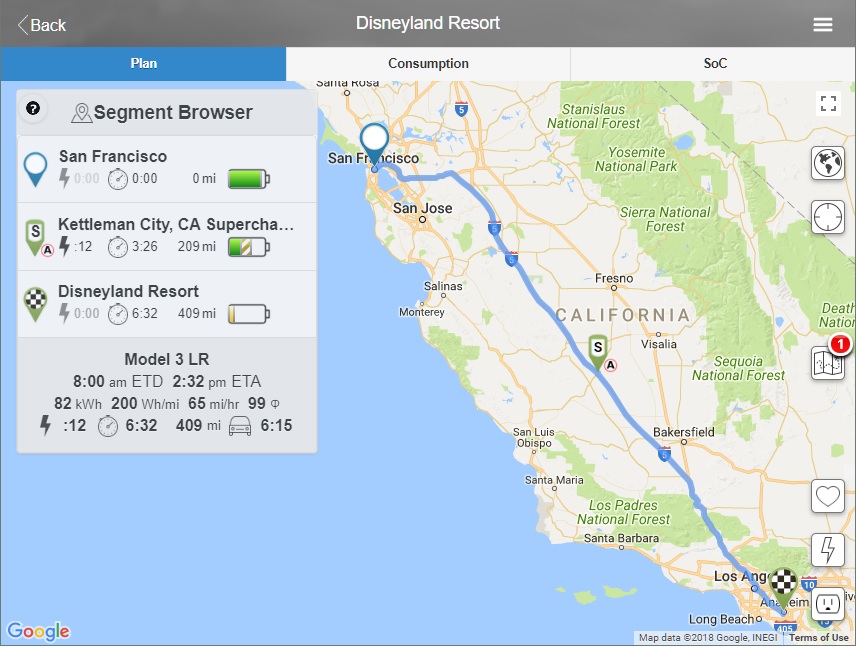
Initial routing with automatic charger selected
4. Increase Destination Arrival State of Charge
As you can see in the map above, we only need to stop once at the Kettleman City Mega Supercharger to make it to Disneyland at our required 15% arrival SoC. But we would like more padding so we have some flexibility for charing at the destination. We will increase the destination arrival SoC to 25%.
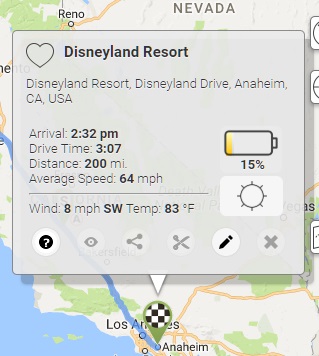
The destination Waypoint Inspector
In order to change the destinations arrival SoC we will use the Waypoint Inspector and then edit the destination waypoint. To access the destination Waypoint Inspector just touch the checkered waypoint marker on the map.
Hint: You can see the temperature and wind forecast for the three hour window around your arrival by touching the weather icon.
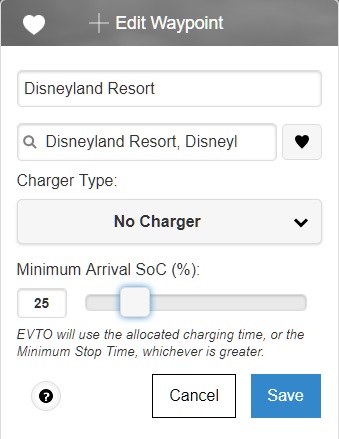
The Edit Waypoint dialog for the destination
Simply select the little pencil icon on the Waypoint Inspector and EVTO will load the destinations Edit Waypoint dialog. Now we can easily modify the destination’s arrival SoC to ensure we have more flexibility to find the perfect supercharger from the dozen or so available. Just drag the Minimum Arrival SoC slider to 25% and then touch Save.
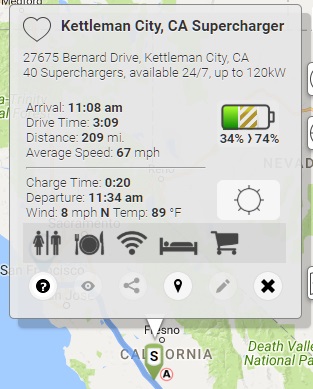
Kettleman City Waypoint Inspector
We are glad that EVTO selected the Kettleman City Mega Supercharger for our stop as we really wanted to experience it. However as we make modifications we know EVTO could replace that charger with other charging stops in order to minimize our travel time.
Note: To lock the Kettleman City supercharger into the trip you would simply select the little pushpin icon button on the Waypoint Inspector. In this case the little (A) on the map icon would disappear meaning that this is no longer an automatically selected charging stop and we will always stop here, no matter what else changes in the trip, unless we remove the waypoint using the (X) button.
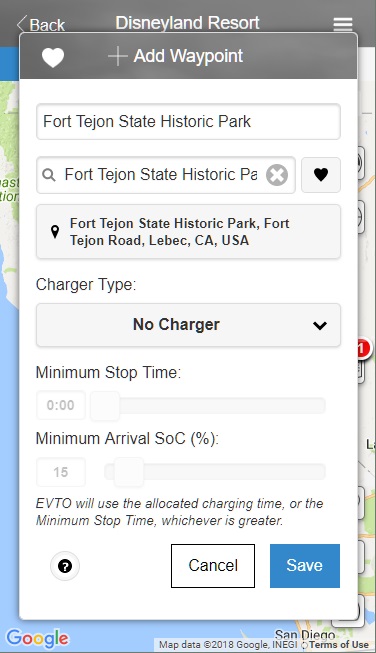
The Add Waypoint dialog used to add a manual waypoint
5. Add Waypoint
While this is a family vacation to Disneyland, we also want our children to experience some of California’s history whenever possible. We have read about an early fort from before California was a state that is adjacent to our route and can easily be accessed from the highway. Since we are arriving at Disneyland in the early afternoon this is the perfect time to visit the historic Fort Tejon State Park.
To add this stop to our trip:
- From the Plan Menu select Add Waypoint. The Add Waypoint dialog will display.
- In the Enter Location input type: fort tejon and select: Fort Tejon State Park.
- Touch Save to add this waypoint as a stop on our route.
Note: There are other ways to add waypoints in EVTO: you can press and hold on the map and subscription users can select Google POI’s.
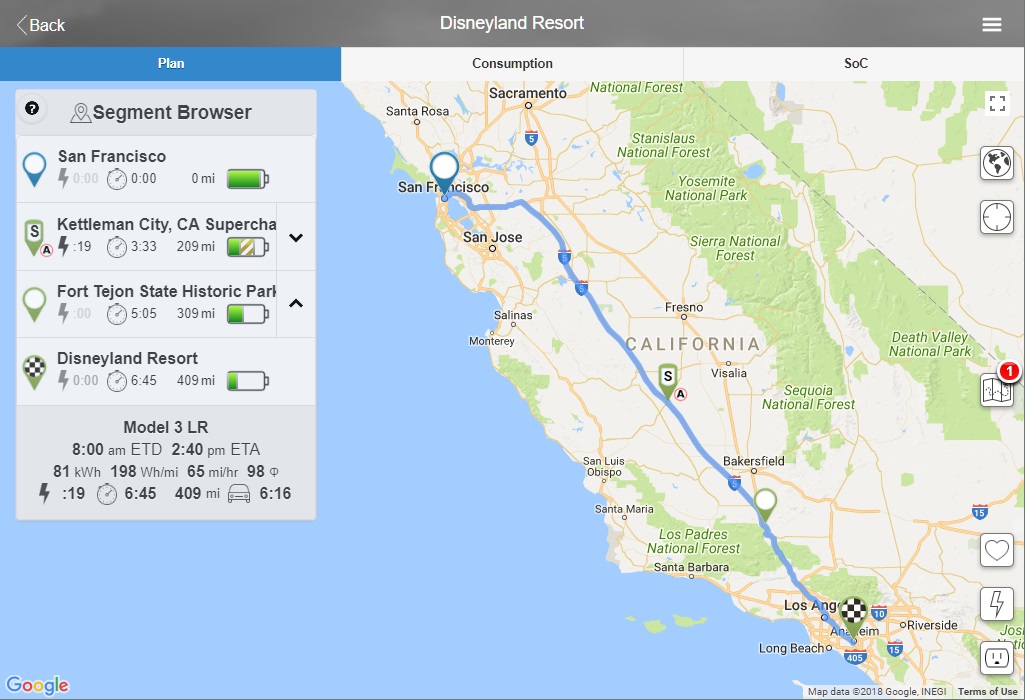
Our final route with charging and historic park stops
6. Consumption and SoC Charts
Most of the planning is done within the map feature (Plan tab) of EVTO but there are two other tabs, Consumption and SoC, that are also useful while planning your trip. Access to these charts are via the tab interface at the top of the panel just below the title bar.
Before we go to the two other tabs it is worth mentioning how to access the Segment Browser, which has been shown before in the maps images. The Segment Browser is accessed from the Plan menu. There is also a corresponding Trip Browser that shows a list of all segments in a trip and which is accessible from the little map button (the one with the red (1)) on the right hand side of the map.
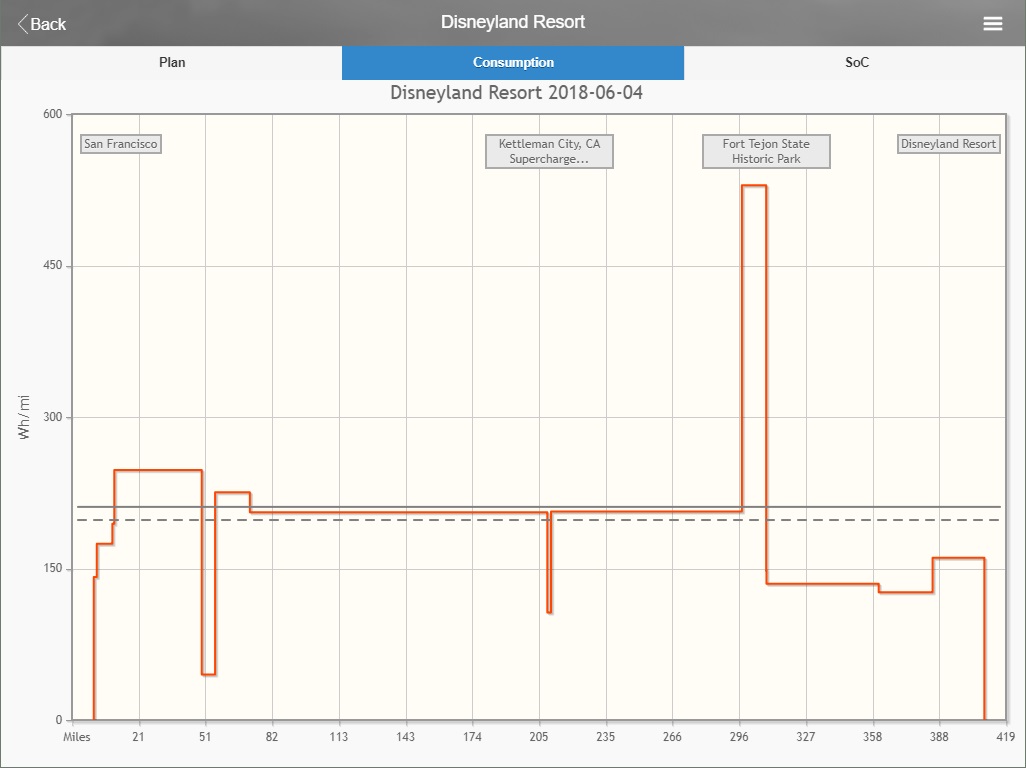
The Consumption chart showing the cars power draw at each turn point
The Consumption Chart shows the projected average energy draw of the car at various points enroute (turns and highway changes). You access this chart by selecting the Consumption tab. Note the steep energy consumption around the historic park stop. This park is right at the top of a significant grade and there is a few miles more of it at a lesser rate before you descend into the LA basin and recapture much of the lost energy.
Much of the trip is within the flat Central Valley of California, hence the flat consumption lines in the middle. The two straight grey lines (solid and dashed) are the cars rated efficiency and the other the trips average efficiency. You can touch either to see the actual number.
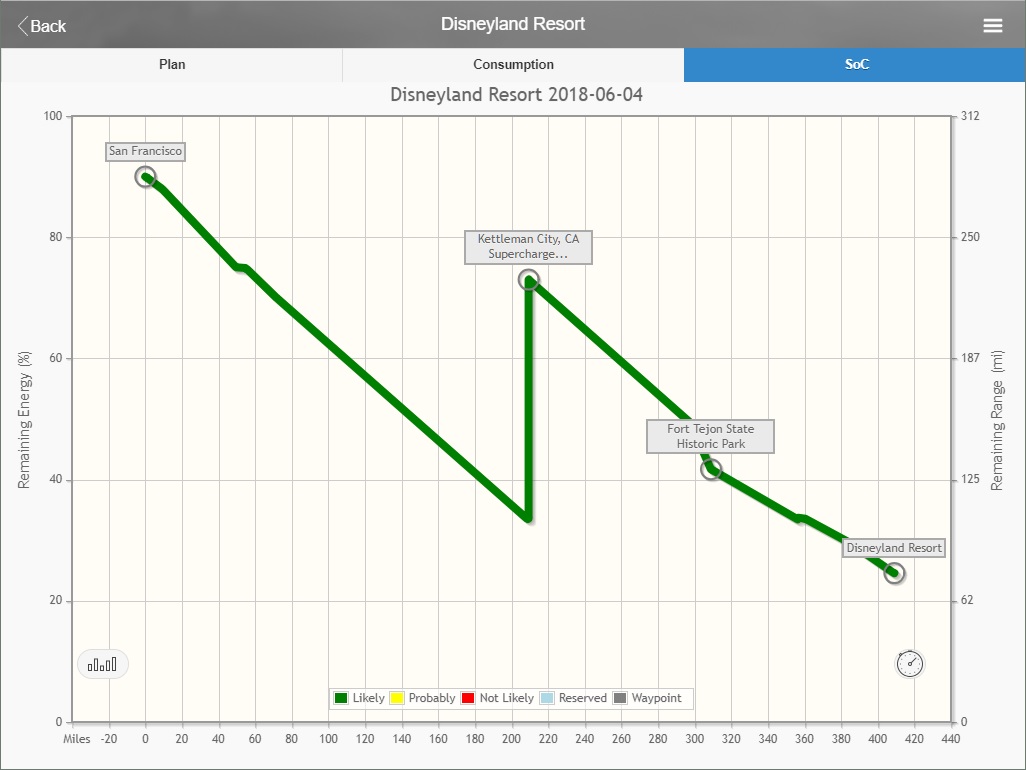
The segment SoC chart
The last tab brings up the segment SoC Chart. This chart will show the state of battery charge at points along the route. Waypoints are depicted as circles with either their name or acronym (phones). The left vertical axis is the remaining range in percent while the right vertical axis is the same based on your distance units.
The charts line will change color depending on the battery state and likelyhood you will safely arrive to that point. You can touch anywhere along the line to see the estimated SoC value as a popup.
The SoC Chart comes in four different versions: line chart by distance; by time; bar chart by distance; by time. To toggle the various versions of the chart use the two icons on the lower left and right of the chart. In distance mode the bottom is in your chosen units while in time mode it is in hours.
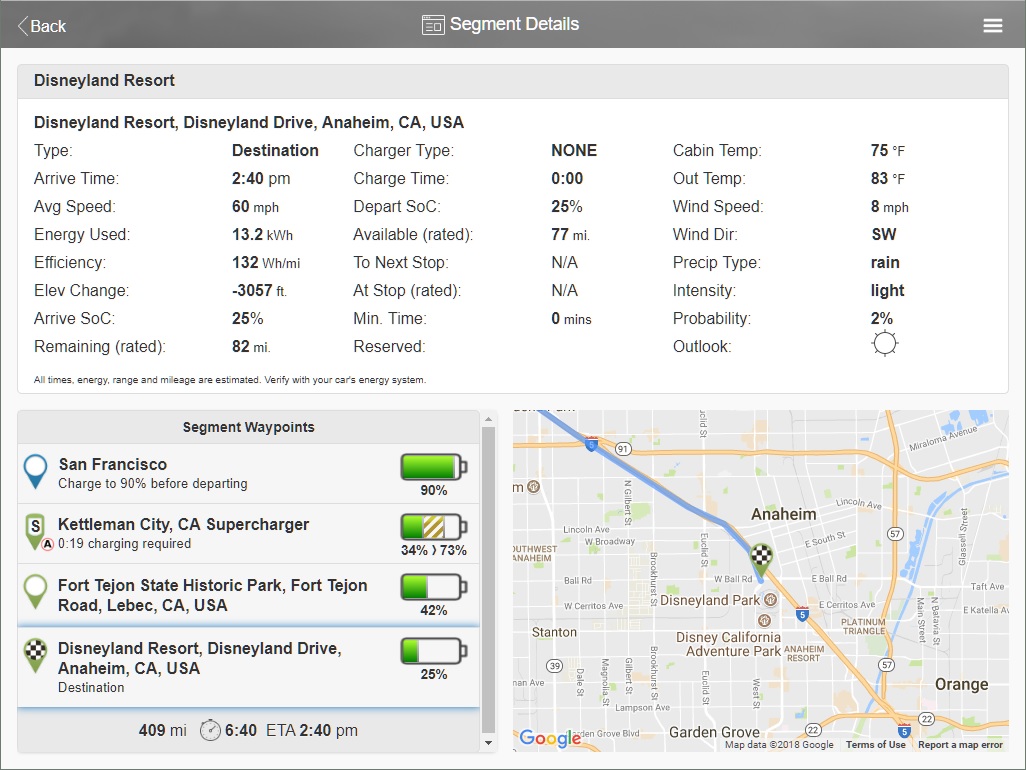
Segment Details panel showing the destination details
7. Segment Details
While you have seen most of the information you will need to effectively plan your trip, there is a lot more EVTO has available to you. One consolidated place to look at the details of a segment is the Segment Details panel which is broken down stop by stop. While the format will change by device size (shown is the tablet version), the content is predominantly the same.
Each stop can be accessed from the waypoint list and will toggle the details for that stop as well as provide a mini map of the location. Subscription users can also email the itinerary and copy the details of each leg into a spreadsheet for further analysis.
Wrap-up
We have shown you how to quickly create a simple trip in EVTO with it’s automatic routing and charging allocation. We have also shown you how to add additional stops (waypoints) that you may want to include in your trip. And we have shown you how to do a deeper dive into the details, or behind the scene information, that could be beneficial to your trip planning.
Be sure to review all of the EVTO website content when you get a chance to increase the effectiveness of your use with EVTO in trip planning.
Loading the Tutorial Trip
You may see the final results of this tutorial within EVTO by importing this trip. Follow these instructions:
- Go to Settings and verify or change the region to North America
- Go to My Cars and verify or set the features for the car depicted in this tutorial.
- Go to Current Trips and select the Import menu item
- Enter the Trip ID of ymsne3t19cjhocy74gqxom and the PIN as 1234.
- You will be warned that if you want to share the trip you will have to make a copy first.
- Select the newly loaded trip and it will open in the Plans panel
- Select Edit Trip from the menu and change the date to a date you would be interested in taking the trip.
- Select Save.
Got an idea for a tutorial? Let us know!