EV Trip Optimizer for Tesla Tutorial
Note: This tutorial is a bit out of date and some of the features may have changed and may no longer apply. It will be updated soon.
Overview
This tutorial provides you with a set of instructions on how to use the features of the EV Trip Optimizer for Tesla (EVTO4T) application. It is presented in increasing capabilities starting with the most basic and simple tasks and builds upon each feature. Use the Contents to move about the tutorial as well as the embedded links within each section.
You might also want to read the EVTO Frequently Asked Questions.
While the graphics portray a tablet device, each feature will perform the same on smart phones and should look reasonably the same.
Note: Rotating the device will sometimes allow you to see the content in a different arrangement that can help in situations where there is lots of data or the data is better formatted either vertically or horizontally.

Initialize Application
Before you start this tutorial you should set up the application to best suit your particular car and preferences. You do this via two menu items on the main panel: My Cars and Settings. After completing the Getting Started tutorial, select My Cars from the home panel menu. Fill out the popup panel with your cars characteristics and press Save.
Note: If you have the Pro version make sure you are careful defining your car(s) as you can have up to five cars defined. Trips are allocated to each car so if you switch from car to car, your trips will change too.
Note: On smaller devices the My Cars screen will have to be scrolled to see all of the contents.
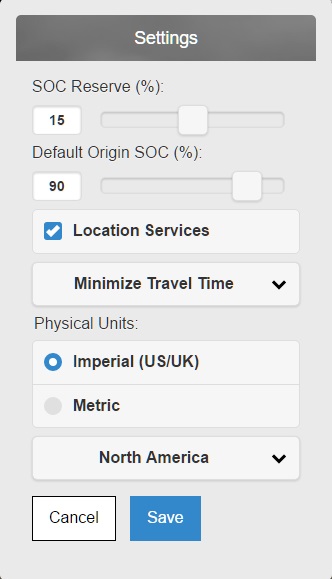
Now go to the Settings menu item from the home panel menu. The Settings popup panel will appear. Make sure Location Services is checked. Also choose your physical units and geography. The other options can be left in their default values at this time. Select Save when you have made your choices.
Note: In order for location services to use your current location as the trip’s origin, you will have to ensure that your device allows this application access to your location information. You can check that in your device’s settings.


Simple Demonstration
Just follow these few steps to get going and then come back here later to understand the details of the application.
- Go through the Getting Started panels – then select Let’s Get Started
- Select the Plan a Trip button on the main panel
- Enter your destination in the second box, choose the appropriate place from the list and press Calculate. A map with a route, your origin, destination and required charging stops will be shown.


- Select the map menu again and choose Trip Summary. A popup panel will display showing you the charging stops along your route and the critical travel times for each step of your journey. Choosing any item will scroll the waypoint into view and show you the details of that waypoint.
- You can see the details of each leg by choosing Trip Details from the map menu.
Note: On smaller devices such as phones, when you select a waypoint from the Trip Summary, the Trip Summary hides. When you close the the map Infowindow the Trip Summary will return and scroll back to the waypoint you selected from the list.
First Trip
For this tutorial we will create a simple first trip. While this trip does not require an application like the EV Trip Optimizer (EVTO), it will be illustrative on how to quickly create a trip and the basic principles involved in trip planning utilized by the application.
Assuming you have initialized the application as described in the first section, we can create your first trip using the application.
Choose the Plan Trip button from the main panel or alternatively you can also use the Plan a Trip menu item from the main panel. The New Trip popup dialog will appear.
For this first trip pick a location within a few hundred miles or kilometers of your current location. Enter the address or place name in the second text input box. As you type a list of locations will appear and be refined as you type. When the location is correct select the location and the location address will be replaced in the second text box for you. The origin will default to your current location.
For this simple trip we will perform a manual routing. Choose Manual from the Waypoint Charger Selection options. Press Calculate when you have chosen your destination location.
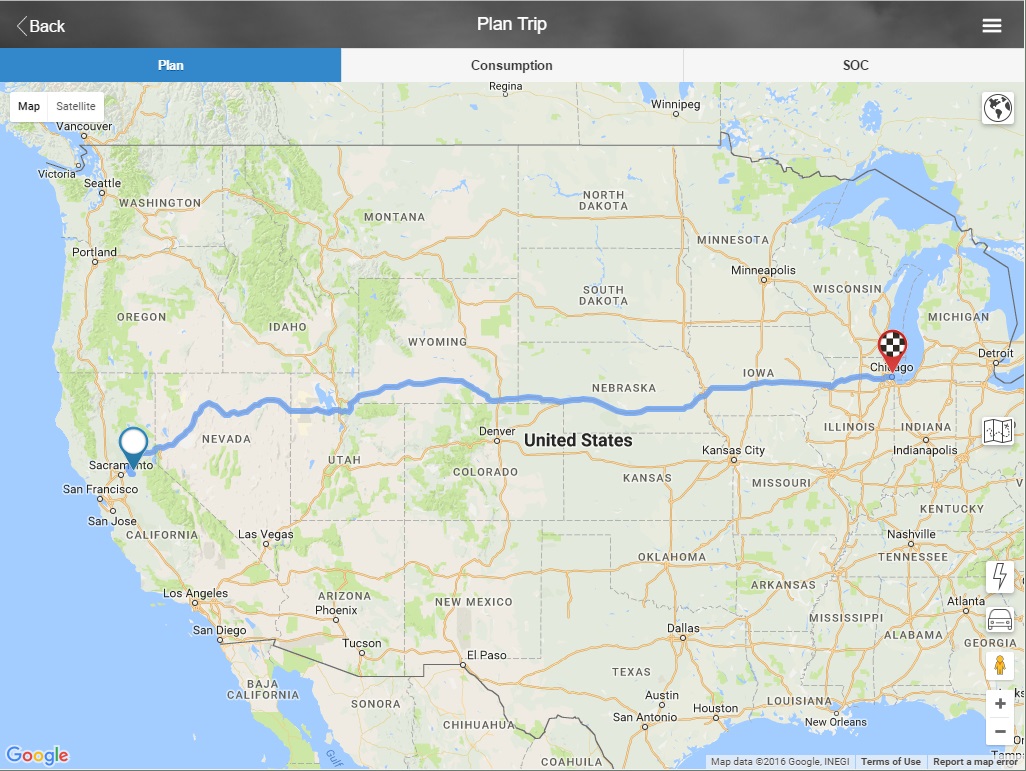
The application will switch to a map, if not already showing and in a few seconds, your route with your current location as the origin and your chosen destination will appear.

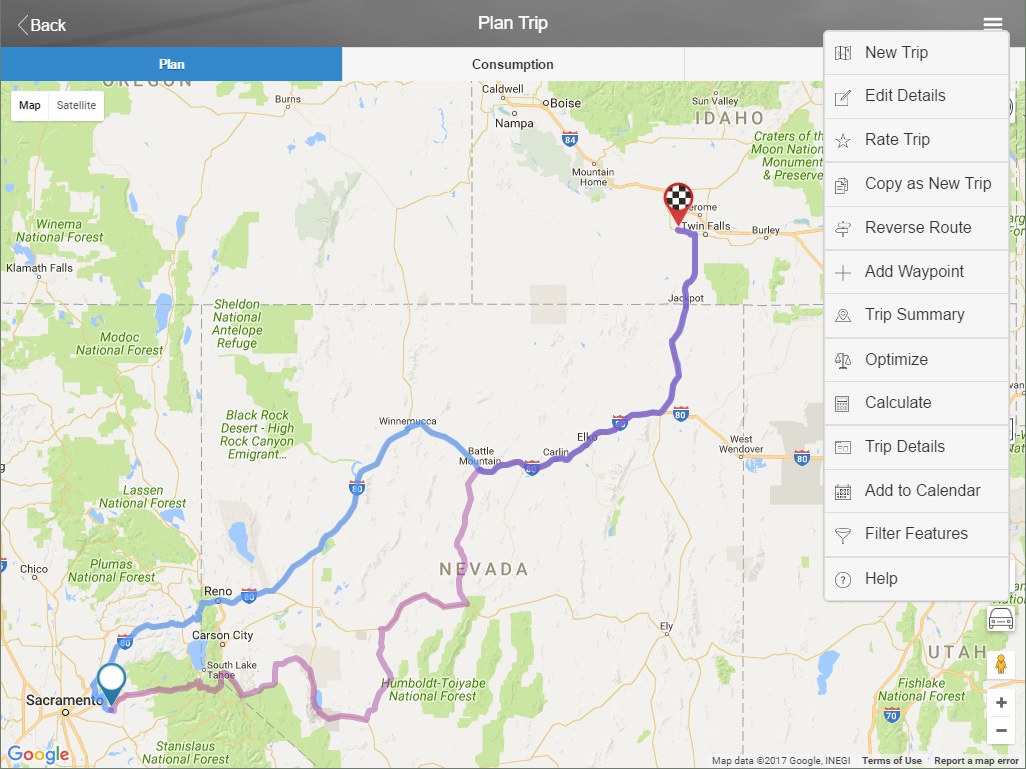
The map is first displayed with the entire route showing. You can move about the map by panning and zooming. To return to the full route select the globe icon in the upper right corner of the map.
The trip is depicted by two colored push pins and a blue route. The routing was done using the best route based on driving time at the time you created the trip. You can touch the route to see the total drive time excluding charging times and stopovers.
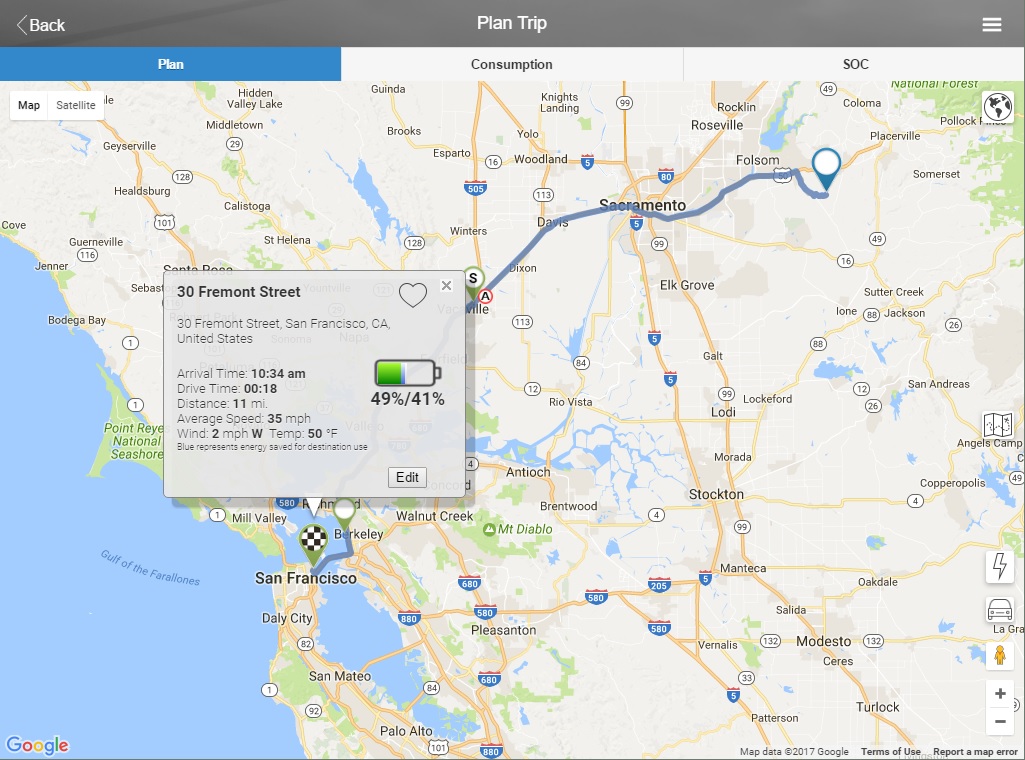
The origin push pin is always blue in color. If you select it, an InfoWindow popup will appear after the map scrolls, in order to display both the origin and the popup. Within the origin popup you will find the name of the origin (or Origin by default), the address immediately below and then on the left the amount of charge in percent the application has used as a starting point (this comes from the settings). Also indicated are the total trip time including driving and charging, the total distance and the weather obtained for this location. On the right is a battery graphic indicating the State of Charge (SOC) at your starting point. The battery color and size correspond to the same schema that is used in the car. Touching the map background will dismiss any InfoWindow popup.
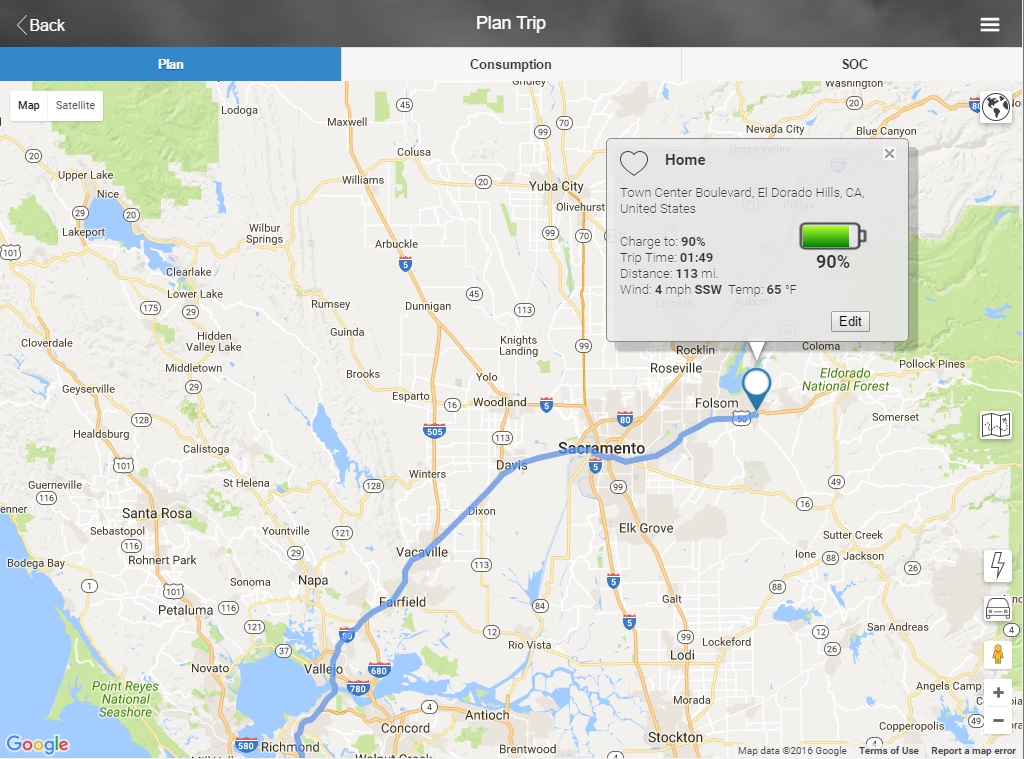
You can now pan the map to the destination or use the globe icon to see the entire route. The destination icon is shown with a checkered pattern. The colors of all non origin waypoints are as follows:
- A green pushpin (as is shown) means that you should make it to this waypoint within the reserves you have specified (these are depicted in the Settings and was 15% unless you changed it).
- A yellow pushpin indicates that you will most likely make it to this waypoint but you may need to reduce your driving speed in order to make your chosen reserve.
- A red pushpin indicates that you will unlikely make it to this waypoint unless you change your driving conditions or the weather improves dramatically in your favor from what was forecast.
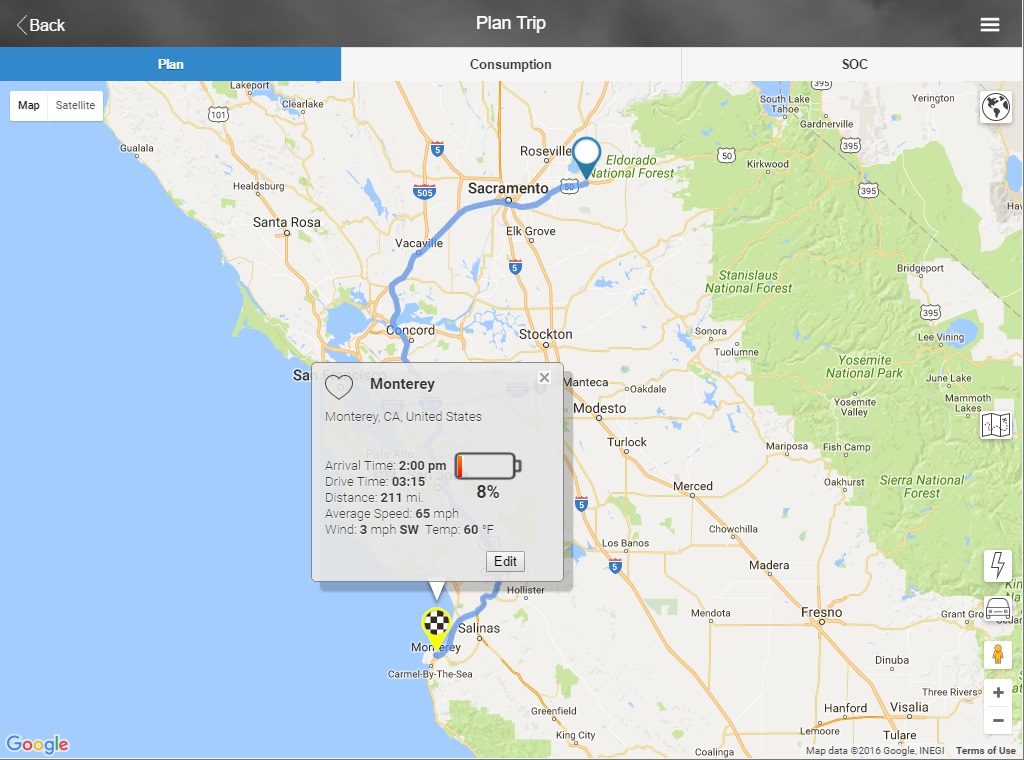
Select the destination pushpin and an InfoWindow will appear.

The destination Infowindow contains the name of the destination, the destination address and battery indicating the SOC upon arrival to this destination using the same color scheme as the car and described above for the origin.
Also included are the estimated arrival time based on the departure time, driving time, charging time at all waypoints and any additional stops you have chosen along the way. The drive time along with the distance in your chosen units, your estimated average speed based on traffic for this time period and the destination weather conditions are indicated as well.
The estimates used to determine the energy consumption and travel times are based on scientific models using elevation, nominal driving conditions, distance, your cars characteristics, payload, your driving style, time of day and weather conditions. Therefore depending on when you travel, the trip time and energy consumed might be different.
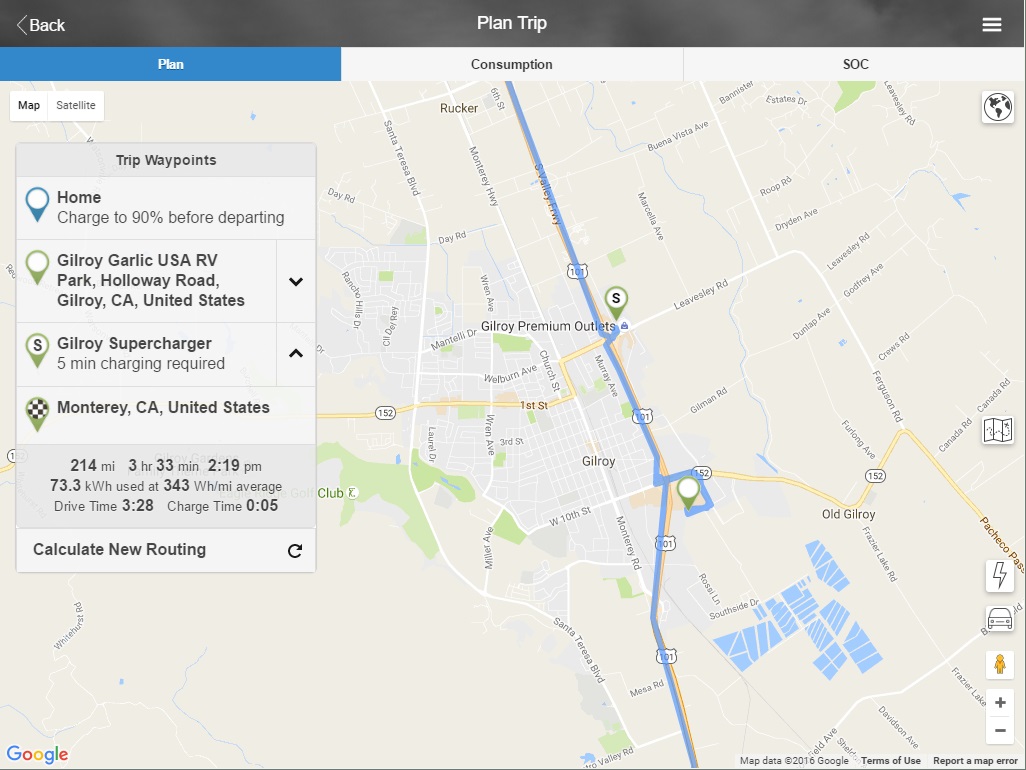
You can get a summary of the trip and waypoints by selecting the Trip Summary item from the popup menu (stacked bars icon).
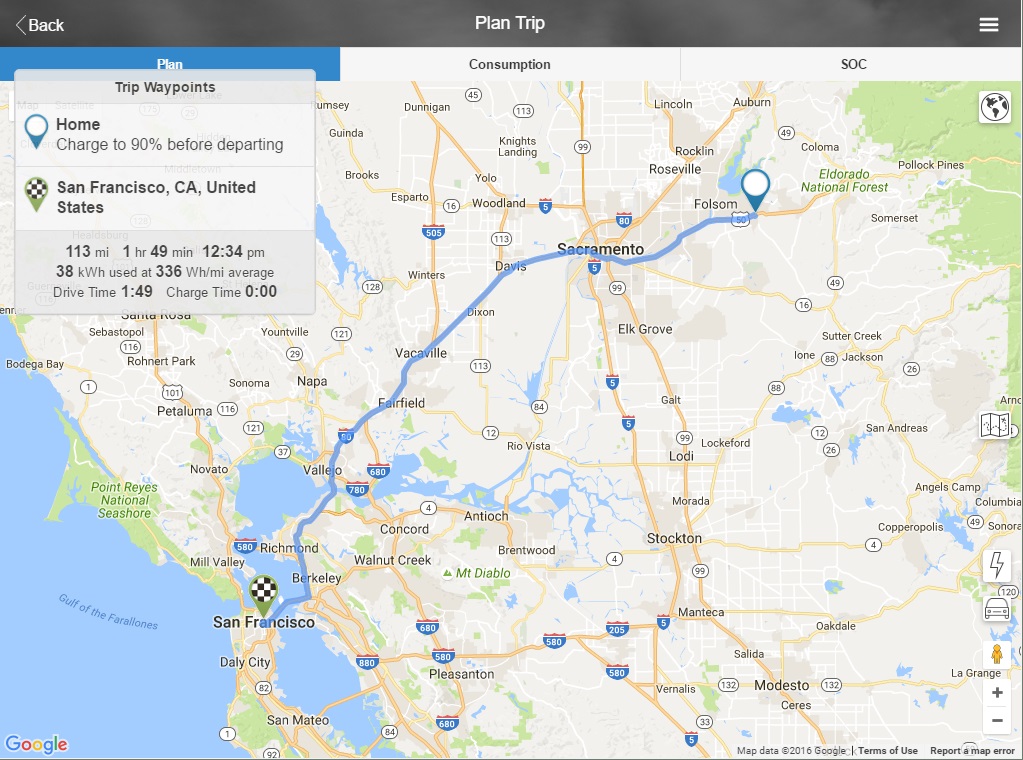
The Trip Waypoints (trip summary) popup will list all of the stops on the trip (waypoints). In this simple tutorial there are only the origin and the destination defined yet. If you select a waypoint from the list, the map will be scrolled to that location and the waypoint InfoWindow will appear.
At the bottom of the trip summary is shown the overview of the trip. The trip distance, time en route, the estimated arrival time, how many kWh are estimated to be consumed and at what average rate (efficiency), the drive time and the charge time are all depicted. Note in this case we have no charging stops and therefore no charging time. This also means that the drive time is equal to the trip time.
Note: Times are always displayed in the waypoints (stops) local time.
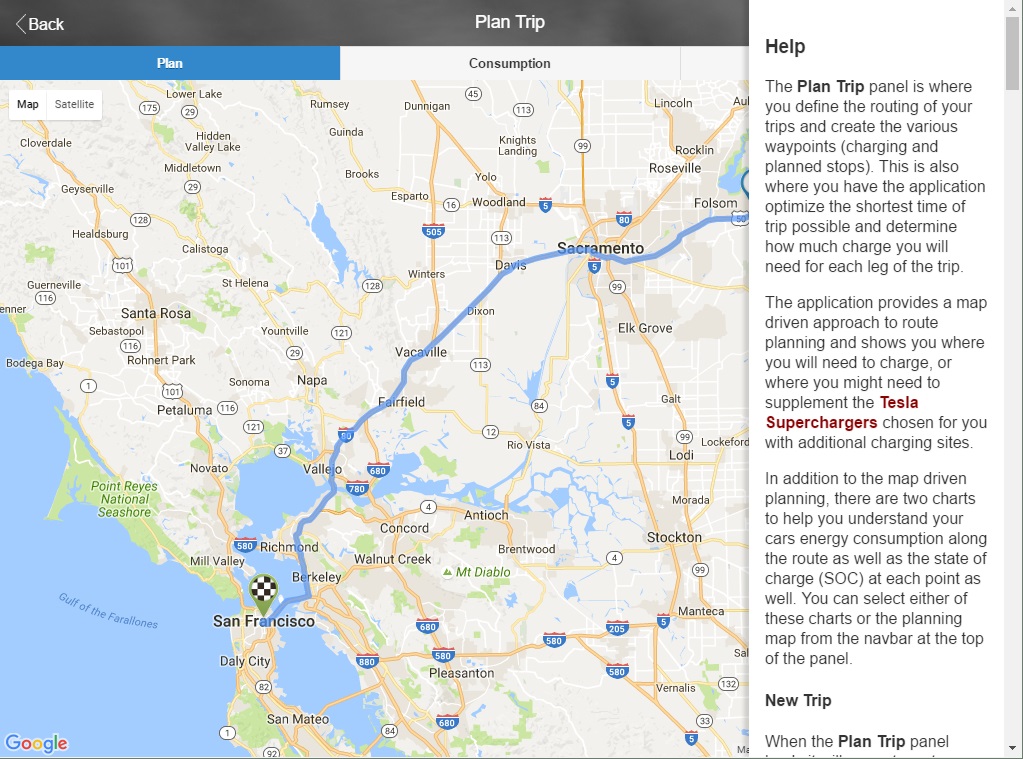
Getting Help
Help is always available in the application and is specific to each panel you are on. Just select Help from the popup menu panel and a scrollable help panel will appear on the right of the screen. Just touch anywhere on the application to dismiss the help panel once you have viewed the content.
Charging Trip
Now that you have a basic understanding on how to create a new trip and what some of the basic elements such as waypoints, the menus, map interaction and popups do, it is time to enhance our first trip with a charging stop. In addition we will demonstrate how you can move and edit waypoints if required.
In this simple exercise we will manually enter a charging stop. Later in the tutorial we will show you how the application can automatically pick your charging stops for you. You can also mix both manually chosen charging stops (perhaps you have favorites) and the application can fill in automatically chosen charging stops around your required ones too.
Editing Waypoints
Instead of creating a new trip, this tutorial will demonstrate how you can change the trips stops, including the origin and destination to suite your needs after you have created the trip.
Select the destination pushpin again. Now select the Edit button on the InfoWindow popup. The Edit Waypoint popup dialog will appear.
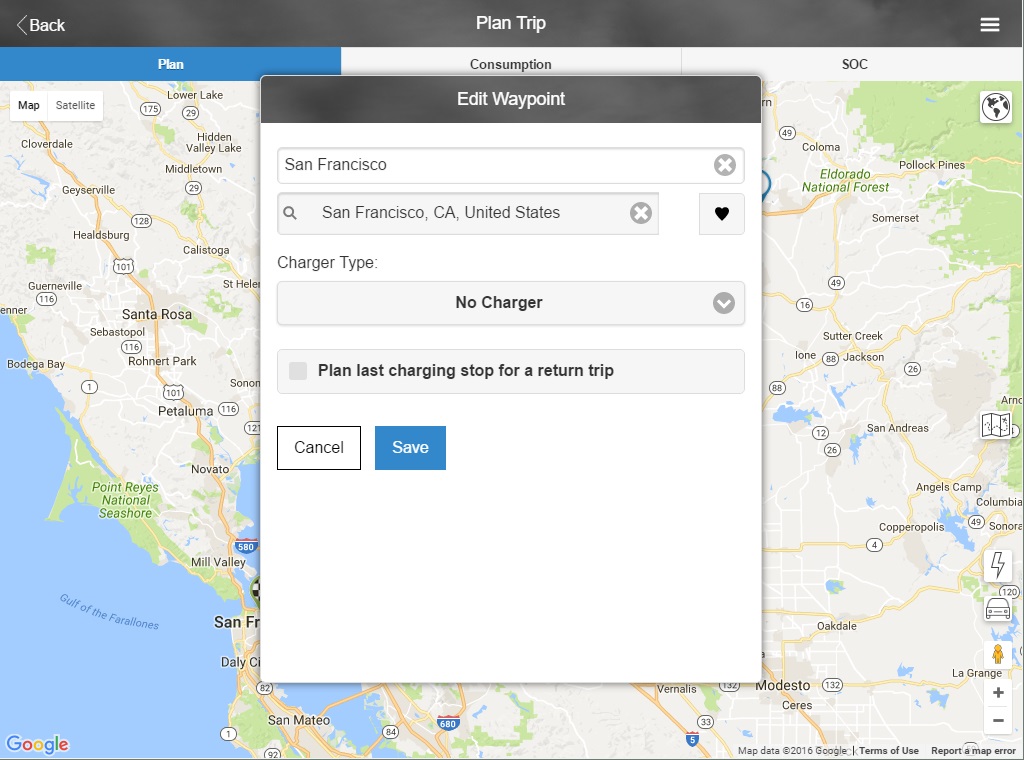
The Edit Waypoint popup dialog looks similar to the New Trip popup dialog because they are both driven by a location. In this case the trips destination. There is an additional element on the destination popup that will be covered in another tutorial (Plan last charging stop for a return trip). Also not described before is the Charger Type for each waypoint which will also be covered later.
For now please pick a new destination about 300 miles (500 km) from your origin that you cannot get to without charging, and that has a Tesla supercharger near your expected route. Ideally the supercharger should be less than a hundred miles from your new destination, but one you can easily make from your origin.
Select the round (X) icon in the second text input to erase the current destination address. Enter a new destination following the requirements above just like you did when you first created the trip. Once your destination is shown select it. Notice that the waypoint name is now the new destinations name too. You may change the waypoint name (first text input field) if you wish.
Select Save to save your new destination and close the Edit Waypoint dialog. The map will now update the route to your new destination. To see the entire route select the globe icon again. The map purposefully does not zoom out in case you want to add other waypoints in the general area. The next time you come to the map from the main panel, you will see the entire route.
Notice in my case the destination pushpin has turned yellow. For my car and the location I picked it could be unlikely that I might make it to this destination within my tolerances (15% reserve). Your new destination will probably be either yellow or red based on how far away it was from the origin, your car type and other conditions determined at the time of moving the destination.
Select the destination waypoint to see the details.
Adding a Charging Waypoint
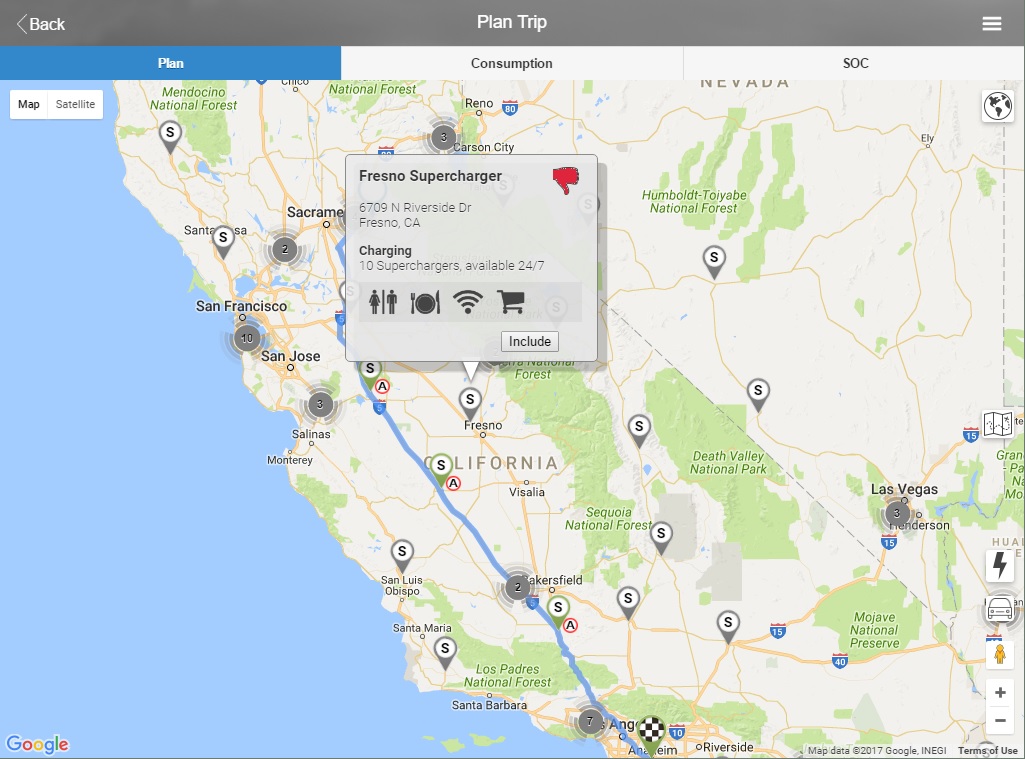
To stay within my comfort zone at arrival (15% reserve SOC) I will want to stop and charge en-route. For the Tesla the best option is to pick a supercharger along the route. To find an appropriate Tesla supercharger select the lightening bolt icon on the lower right of the map. When the lightening bolt is solid black it is showing the available superchargers. To remove map clutter you can toggle this off by re-selecting it and the icon will turn white.
When toggled on, Tesla superchargers will show as gray pushpins or a collection of chargers will show as a cluster with the number of chargers contained within that cluster. Superchargers are shown with an S in the center while Tesla HPWC’s are shown with an H.
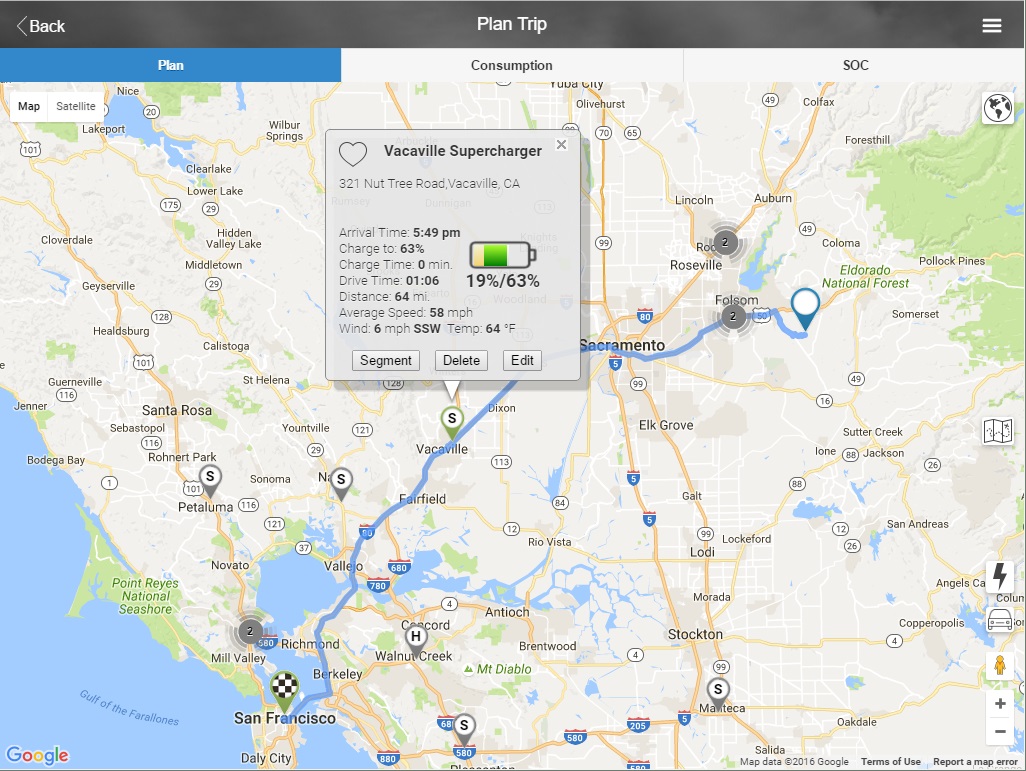
Select the pushpin for the charger you wish to stop at. A popup InfoWindow appears with the charger name, location and the number of stalls. Select Include to add this waypoint and charger to your trip. The route will be recalculated.
I have chosen a charger near the end of my trip. Generally its advisable to do this if you want to charge for the least amount of time because a lower SOC battery charges faster than a higher SOC battery. One of the great features of this application is to allow you to experiment with which chargers give you the shortest trip time while staying within your chosen or required parameters. This will become more apparent as the tutorial evolves.
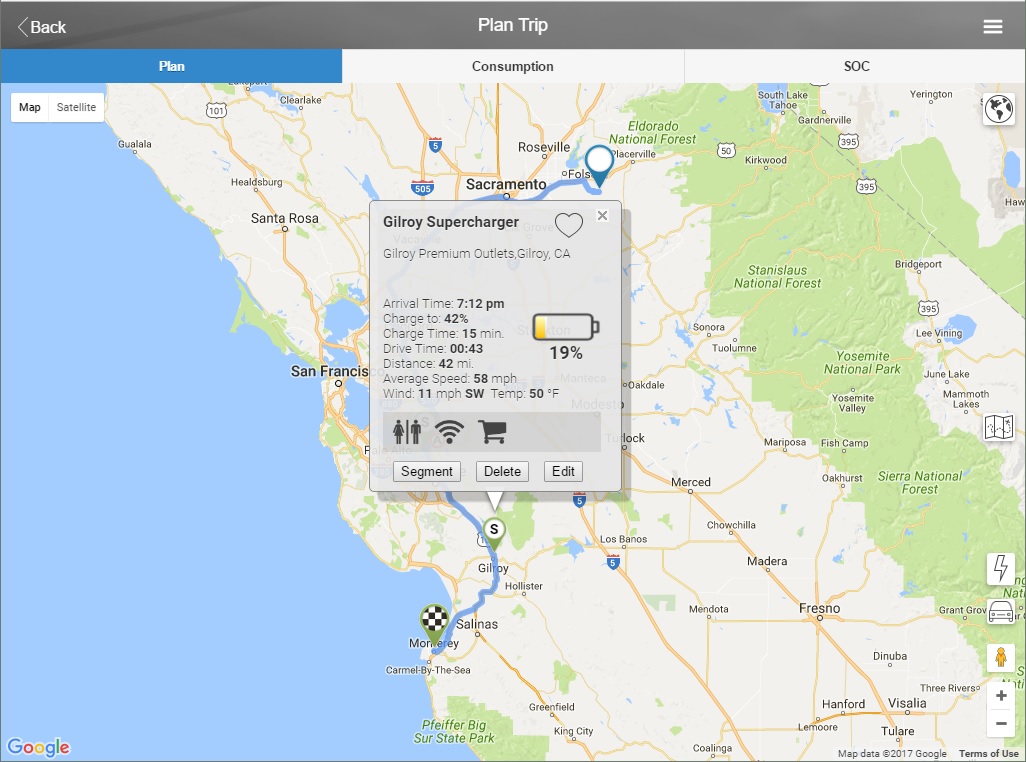
You will notice the InfoWindow popup for this new waypoint is slightly different than both the origin and destination ones we have seen before. Now included are items labeled Charge To and Charge Time. This waypoint also has two additional buttons, Segment and Delete. The Segment button will be described later and the Delete button will remove this waypoint from your trip. Also included with supercharger waypoints are a set of amenity icons depicting the types of features you can expect at this charging location.
When you select the destination you see the new SOC at 15% (my default reserve SOC). The application has targeted this level of SOC for me because it’s ideal to get to a waypoint at the lowest SOC you can. This means my charging times will be less than if I charged with a higher arrival SOC. This repeats as you add more chargers to the trip.
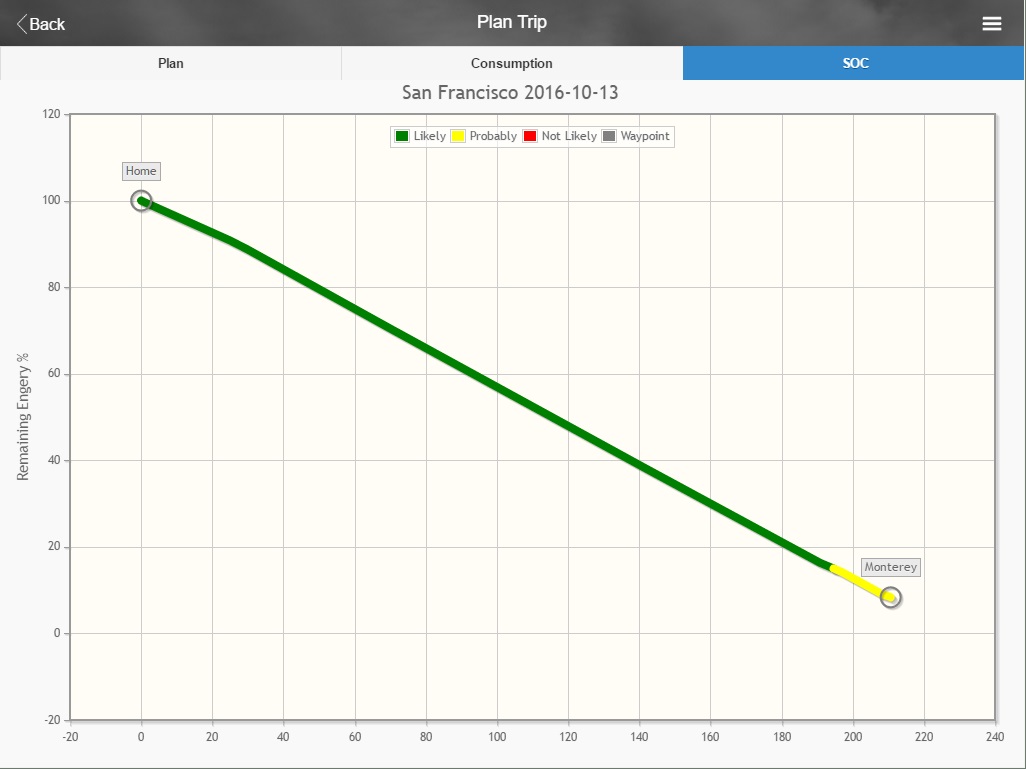
State of Charge (SOC) Chart
If you select the SOC tab above the map you will see the SOC Chart. This will show you the SOC at every point along the trip. Note that it dips to 15% at the Gilroy Supercharger where it is increased to 31% before I leave the charger site. This ensures that when I arrive at my destination I will be at my minimum reserve SOC of 15%. All of the parameters that could influence energy consumption along this route were utilized to determine the SOC required at this supercharger for me by the application.
Note: The application uses state of charge (SOC) versus rated distance (miles/km) as it is more accurate since it does not vary by driving style or conditions.

The SOC Chart can change colors based on what level of charge the application determines you will have along the route. The next images shows what it looks like without the Gilroy supercharger stop.
Notice the yellow tail as the SOC drops below my minimum reserve SOC. If your destination was further out it could turn red and in fact show a negative SOC, which just indicates you have over committed the battery.
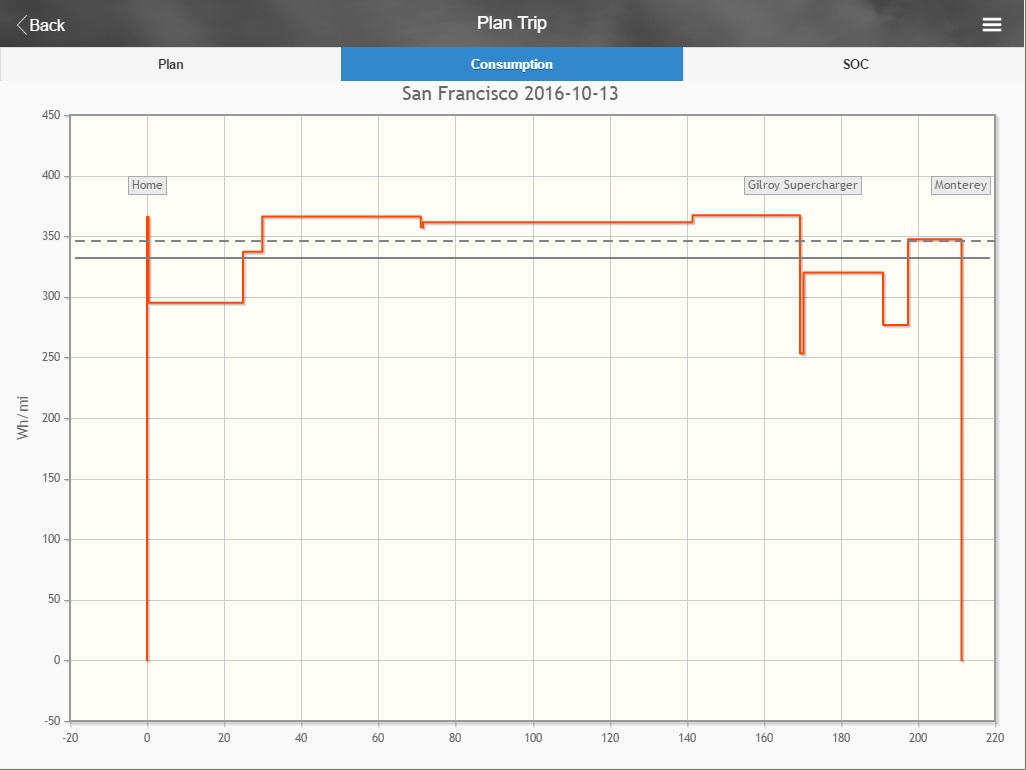
The Consumption Chart
Also included to help you understand the consumption of power is the Consumption Chart. You access this from the Consumption tab above the map. This shows the average Wh/distance (efficiency) for each leg of the trip. The two lines represent the average consumption for this trip (dotted line) and the rated efficiency for your car (solid line). You can touch each line to see the numeric value and label. The spikes in the chart occur because near the stops you are either regen braking or accelerating or even going up or down inclines to get stopped/started at the waypoints.
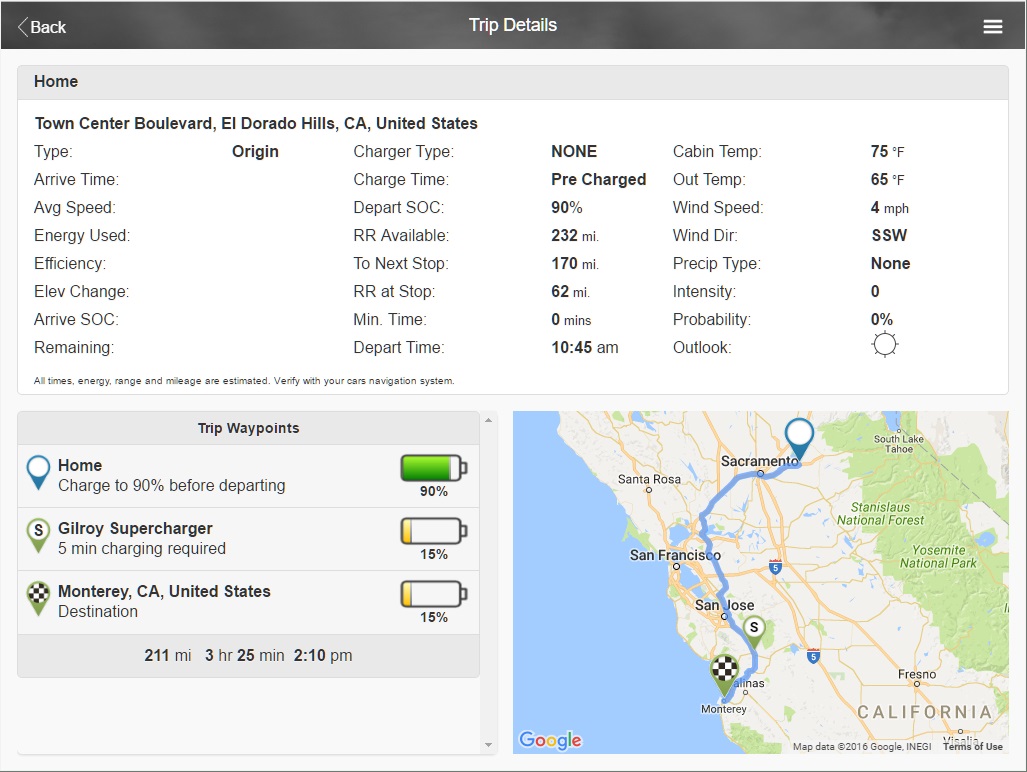
Trip Details
From the Plan Trip popup menu you can access the Trip Details panel. This panel shows you the details at every waypoint along the route. When first loaded you will see the origin details and the entire route in the map. If you select each waypoint in the Trip Waypoints list, the map and details will change.
Note: You can swipe left and right on the tabular data panel to move about the waypoints.
If you have the Pro version of the application, you can export the trip details using the menu to a Comma Separated Variable (CSV) format to be used in spreadsheets or other applications. You can also send your itinerary by email from the popup menu.
Auto Selection of Chargers
You have seen how to manually select charging spots in the tutorial above. The application can also pick your charging stops for you based on various criteria such as shortest travel time (default), shortest distance, least energy or minimum stops. These options are indicated in the Settings popup panel from the Main Menu.
If you wish you can also pick the spots you would like to charge at and have the application fill in the remaining charging stops for you, as needed.
To create a trip where the application picks the optimal routing and chargers for you automatically is very easy. Start your new trip by selecting one of the new trip menu items throughout the application. When prompted simply enter the name of your destination and select from the list below. If you are not starting at your location you may also enter an address or place name for the starting location. Select Auto from the Waypoint Charger Selection options and then press Calculate when you have entered your location(s).
Optimizing the Route
Selecting Auto will have the application interact with the optimization server and determine the best routing for you to take on your journey that satisfies the optimization model you have selected in the settings. In most cases this will be the shortest time, but could be the shortest distance, least energy or minimal stops.
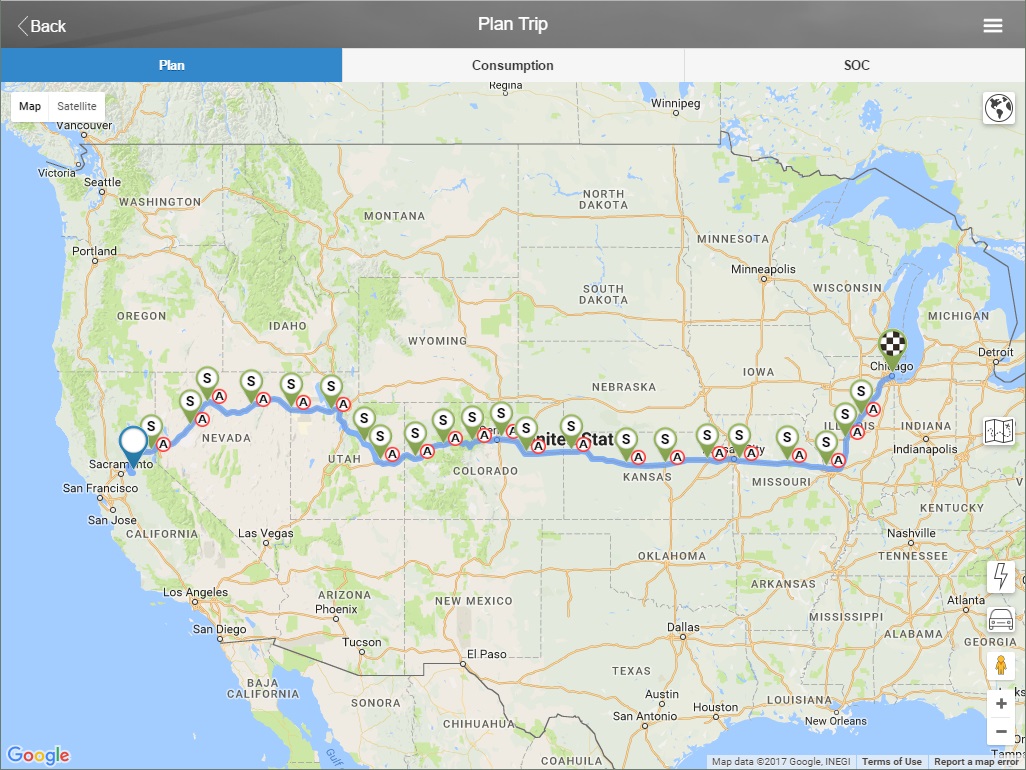
In a few seconds the application will optimize all of the parameters available including your locations, your car’s characteristics, driving times, driving characteristics, weather (including temperature, precipitation and winds), road conditions, climate control and elevation gains/losses to determine the most optimal path. You will notice that the charging icons look a little bit different than what we have seen so far within the tutorial. They still have a colored pushpin (likely green) with a S in the center which indicates a Tesla supercharger. But now they have a little red circle with an A which indicates this is a automatically selected charger. Notice also that the destination pushpin is now green indicating that the application optimized your routing and charger selection to insure you safely arrive at your destination within your stated minimum arrival state of charge (SOC).
You can also optimize from the menu from the stacked bar icon. Notice about half way down there is an Optimize item with a scale icon. There is no need to optimize with every change. The application will automatically recalculate your trips, obtain new weather forecasts as needed and insure that you have an updated estimate of your trip. You can check the validity of the routing by looking at the SOC chart. If there are any red or yellow segments then it is time to optimize, which you can do from the menu.
Required Chargers
Chargers that have been selected during the optimization process will stay with the routing until you optimize again. There is no need to optimize unless you have changed the origin or destination or you feel the weather has changed dramatically. If you do optimize the route again, there is no guarantee that the chargers that have been picked for you will be the same ones chosen again. You will get the most optimal set for the conditions as they are known or predicted at the time you optimized.
However there is something that the application cannot predict: what your personal choice or experience is with a particular charging location. For example in some areas there are three or more sets of superchargers within a few miles of each other. From your experience you may have found a set of chargers you prefer over others. Or you may wish the application to always use a particular set of chargers based on restaraunts nearby or the likelihood the stalls will be free.
Note: See Disliking Superchargers below for a way to reduce the likelihood a set of chargers is picked for you.
The application allows you to convert an automatic charger location to a fixed (required one) by simply pressing one button. By doing so the application will continue to utilize the chosen charger regardless of what the optimization model thinks is best.
To fix a charger location select the automatic charger pushpin and then select the Require button from the Infowindow popup. You will notice that the little round circle with the A disappears, indicating this charger site is now manually controlled. If you no longer desire this charging stop to be required, simply delete it, and then when you optimize again, the application will chose the best routing at the time, which may or may not include this charger location.

Manually Selecting Chargers
Our goal in designing the application was to provide you with enough information and capabilities to help you choose the best spots to charge. Use both the Tesla chargers (lightning bolt icon) and the alternative route chargers (car icon) to display the possible charging spots. We have placed the SOC Chart and Plan Map immediately accessible to each other as you will use both of these tools to decide where to charge and to immediately test your choices. In addition, the Trip Summary panel will tell you immediately if you have saved time in choosing one charger over another, when you have a choice.
You can mix the techniques found in this section with the automatic routing and optimization described just above. Many users like to start with the automatic method and then add or choose waypoints manually to best meet their choice of stops or travel features. And once you manually pick charges you can also optimize again and the application will work around the waypoints you have selected insuring you receive the most optimal route within the constraints you have indicated.
There are a few simple rules about choosing the best charging spots for your trip.
- First start your trip nearly or fully charged (90 to 100%). In this way you might be able to skip a charger at the start of the trip and at worst case, you won’t have to wait as long at the first charging spot.
- Get familiar with your own car and driving style. Determine how far you can travel comfortably in various terrain and weather conditions. Remember roughly how many miles that is and just pick your next charging spot approximately that distance from the last. You will quickly realize that just looking at the map spacing you will have a pretty good idea which charger should be next.
- Pick superchargers first and then fill in as needed with the non superchargers. Non superchargers should be your last resort because they charge so slowly
- The application will immediately determine what the charging requirements and range will be and will show you if you have overestimated (yellow or red pushpins) or if you have underestimated (look at the SOC Chart and see if it really needed that charge yet or was their sufficient energy remaining).
- The SOC Chart will also show you when you need to charge. Look at it and see where it turns yellow. This is how far the car can make it comfortably. Just find a charger closest to that point up route.
- Ideally you will only charge to about 50% – 80% SOC at each stop. If you can stay within this range your charging will be faster and even though you might make an additional stop, the overall trip time may be faster than charging to 90% or greater at less stops
Go ahead and constantly flip back and forth between the Plan Map and the SOC Chart as well as the Trip Summary popup to check your work. These tools are what makes the application useful. You can either choose to let the application pick your charging stops or assist it or do it completely manually. The choice is yours as the EVTO application will let you plan your trips in any manner you wish.
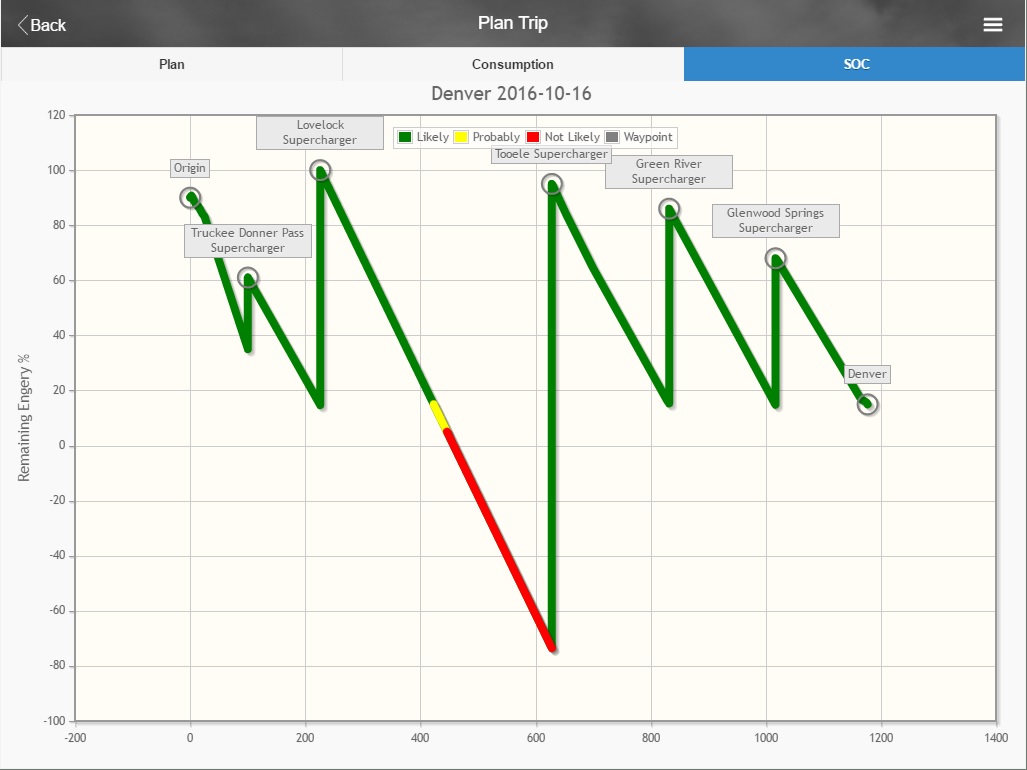
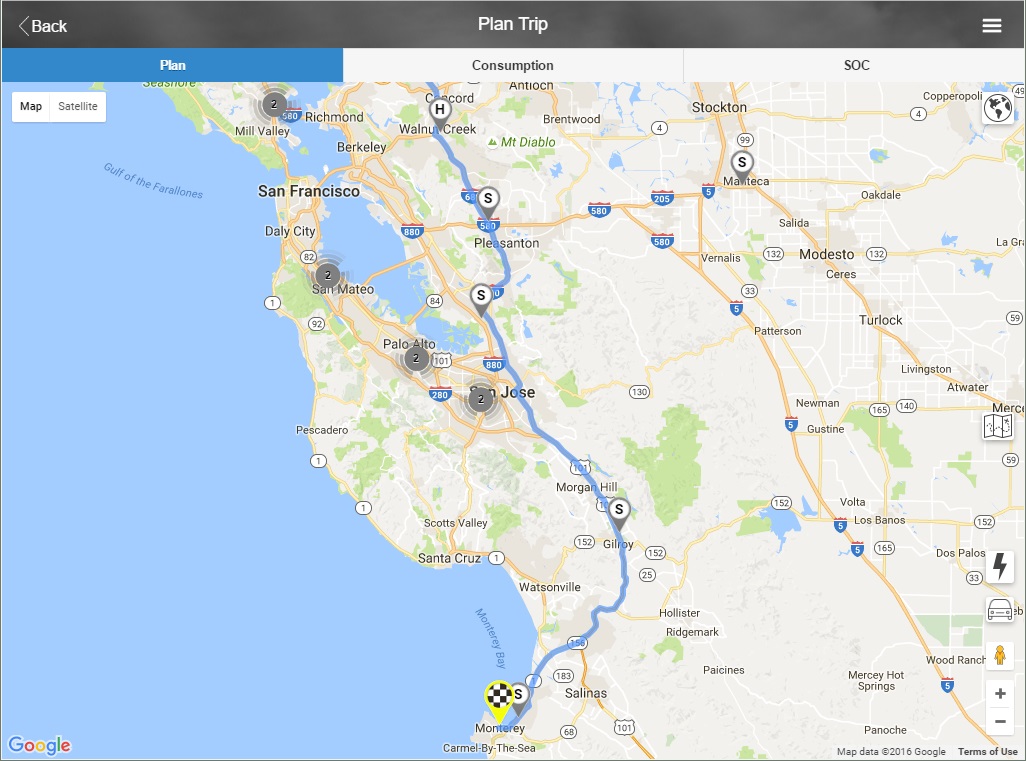
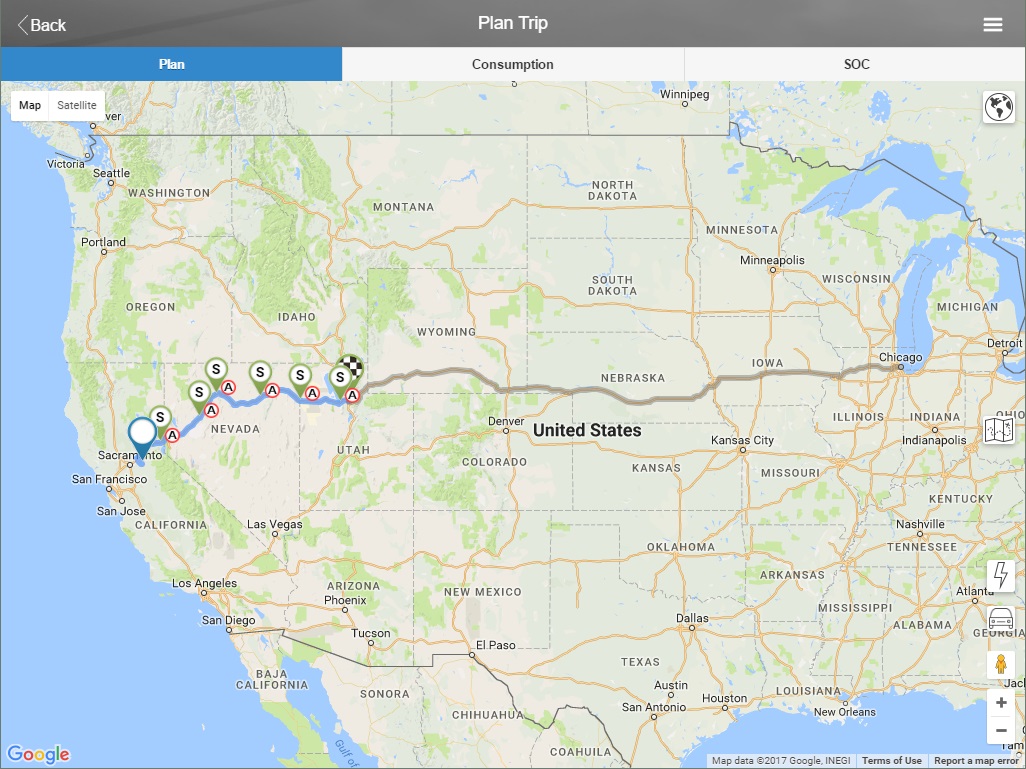
Notice on the image above the average spacing of superchargers for this particular car (a 90D Model X) is about 200 miles. The exception was the first 200 miles which was a climb from sea level to over 8,000 feet elevation. That leg required an additional stop of which there were three choices.
Note also that I have left off one charging stop so you can see what the SOC Chart looks like when it’s telling you how far out you need to charge. So I just have to look at the map and pick a spot that is again, roughly 200 miles from my last charger (the Lovelock Supercharger).
Note: This is really at least a two day trip, if not three, and I only show this to illustrate the charging spacing. I would never attempt to drive straight through from Sacramento to Denver in one trip segment.
Directing Routing
Generally the routing picked by the application and your choice of superchargers is sufficient. However there are times where you need to force the routing to suite your needs. This can either be because you need to travel a certain route based on the availability of charging stops or points of interest, or where you need to visit a waypoint out of order from a purely travel time perspective. For example you may want to visit a museum first before it closes even though it would require backtracking to the next charging stop.
For this reason there are two features within the EVTO application that allow you to change the automated routing. They are:
- Adding your own waypoints (both charging and non charging stops)
- Reordering the waypoints manually
Both of these techniques will be covered next in this tutorial.
Adding Waypoints
To add a non dedicated charging waypoint such as a museum, restaurant, place of interest or other location not predetermined as a charging stop, you use the Add Waypoint feature.
To add a waypoint you can either press and hold the map at the place you want to add the waypoint, or use the Add Waypoint menu item from the Plan Trip menu. The Add Waypoint popup dialog appears.
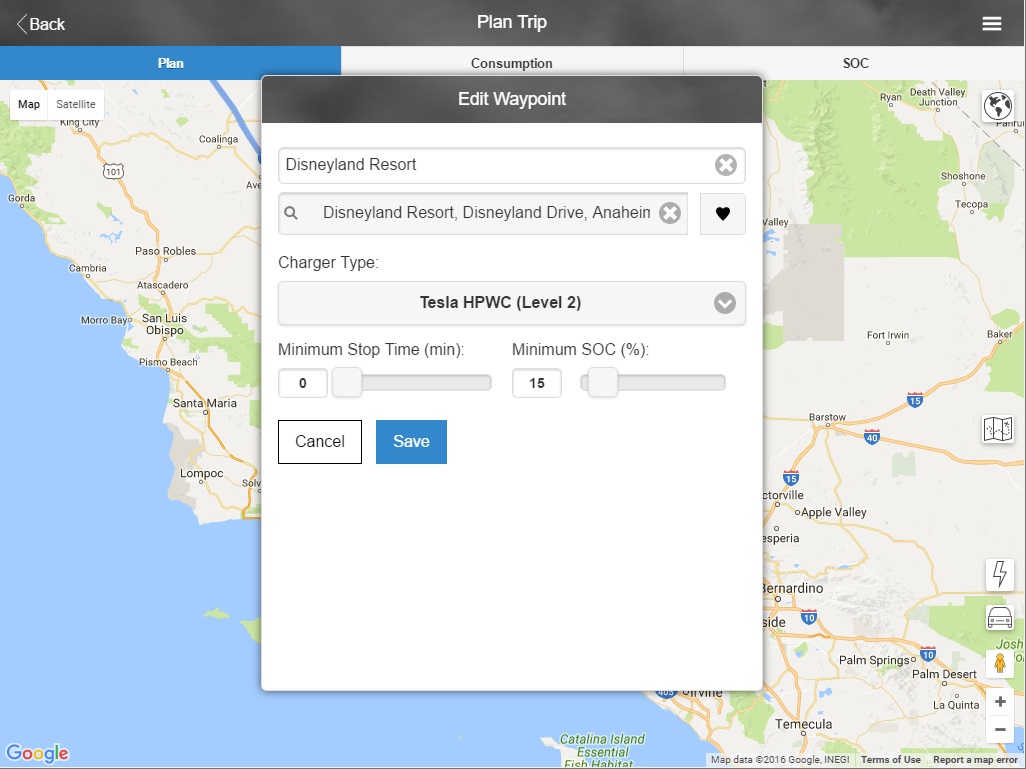
When you add a waypoint it is essentially the same technique as changing the waypoint address. You enter a waypoint name or address and select from the list of waypoints found. You can also optionally indicate if this waypoint has a charger or not and what type of charger it is. If there is a charger at this waypoint, and if the application determines it needs to charge here, the charger will be included in the charging estimates. If there is not a charger, or the charger is not needed, the waypoint will just become another stop on the trip.
Pro Tip: If you change the Charger Type to Supercharger first, you can then locate superchargers by their name as an alternative to using the map icons.
You can also include the Minimum Stop Time and the Minimum SOC you want to have before leaving this waypoint if necessary. Do not change these items for this tutorial though.
Waypoint Order
You can force a waypoint order by using the Trip Summary popup. In this case we want to stop at an attraction before we charge and continue our trip to Monterey.
To change the waypoint order use the ∧ and ∨ icons next to the waypoint names to move a waypoint up or down in the list. When you have reordered the waypoints the way you want them to appear in your trip, select the Calculate New Routing button at the bottom of the popup panel. Later you can restore the automatic waypoint ordering by returning to the Trip Summary panel and choose the Restore Auto Waypoint Order button.
Note: you can change the order of waypoints as you feel necessary. Later though if you choose to optimize the route, the waypoints may change their order from the order you chose manually. You may need to reorder one or more waypoints after optimization.
Reserving Energy
Generally it is advisable to arrive at a waypoint or a charging destination at the Minimum Reserve SOC that you are comfortable with and have set on the Settings of the application. The EVTO application will use this value and optimize the trip in order to come as close to this goal as is practical given all the parameters and conditions expected en-route. In this manner you should arrive to your destination in the least amount of time and utilizing the least amount of energy. We recommend a reserve SOC setting of 15% but you can tailor this value to suit your needs and comfort level.
However there are times that you may wish to increase or decrease the SOC at a charging waypoint or to reserve extra energy at your destination for local travel or to return to the last charging point when the destination does not have charging.
Note: You can only reserve energy at manual waypoints. If you wish to increase the departure SOC on an automatically selected charger, you will first have to make it required (as described above).
Increasing the SOC at Waypoints
Normally when you get to a charging waypoint the application will determine how much energy is required to make it to the next waypoint and still have a reserve based on your Minimum Reserve SOC remaining. To adjust the SOC at a waypoint select the Edit button from the waypoint InfoWindow. The Edit Waypoint popup dialog will appear.
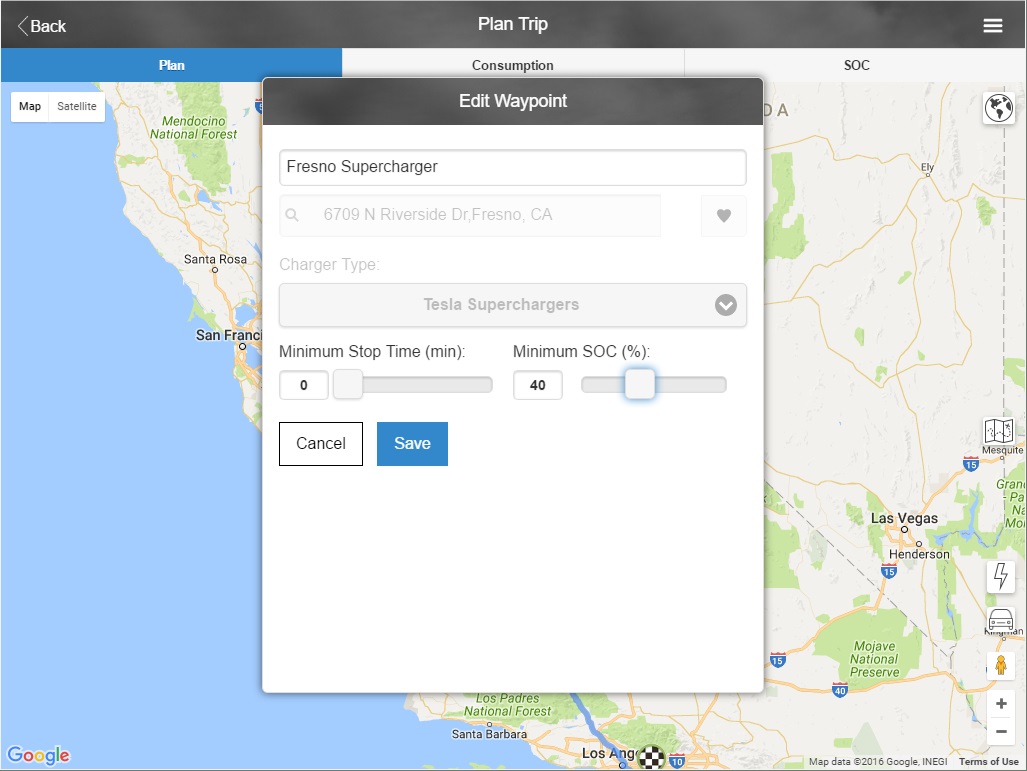
You can adjust the Minimum SOC by moving the slider to the value you would like to have when you leave this waypoint.
Reserving Energy for Destination Travel
One use of reserve energy that is very practical is when you want to use it at your destination for local travel when there is no charging option. Often you will use superchargers to get to your destination but you may still want to use your car at your destination too. The application can account for this use and reserve enough energy (based on distance versus SOC %) for your destination use.
To reserve energy for destination travel select Edit Trip Details from the Plan Trip menu. The Edit Trip Details popup dialog will appear.
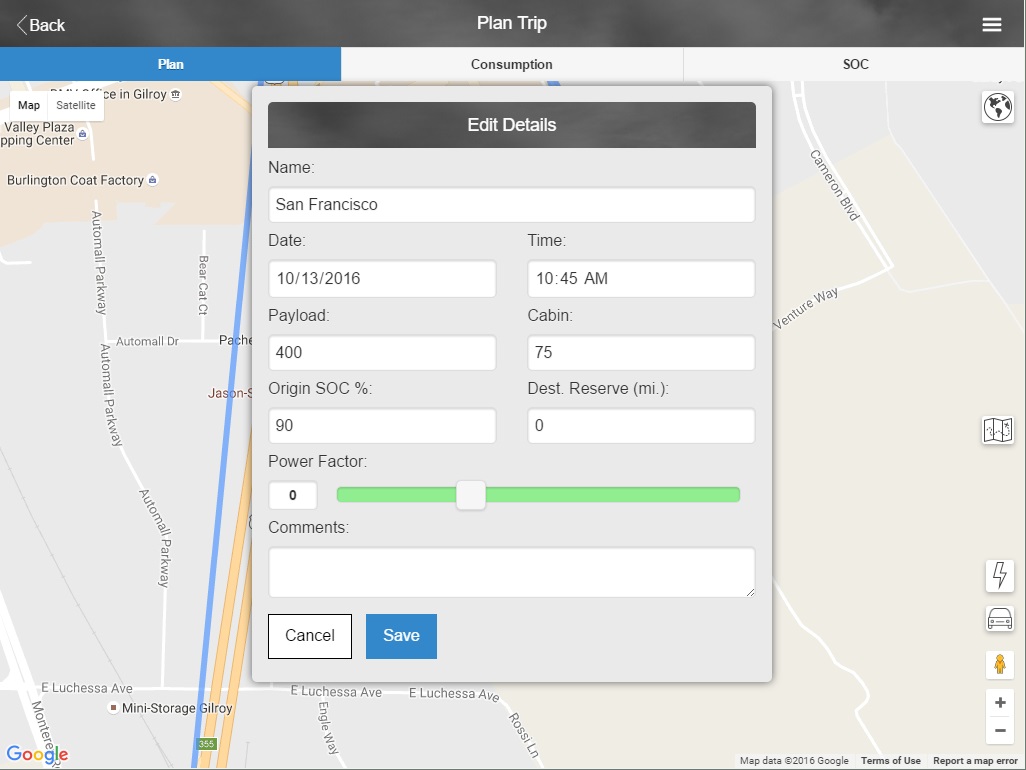
Enter the distance (mi or km) in the Dest. Reserve numeric input field. Remember this is a distance value that you want to save for your local destination travel.
In the image below the battery is depicted in two states: The left side in green shows the SOC that you will arrive at your destination with. The right side in blue is the energy (in % SOC) that is reserved for your destination travel. The application assumes you will be using all of this energy before you depart hence the second SOC % figure below the battery shows the % SOC the applications assumes you will finish your destination stop with. This same energy will be carried to a the next segment on a multi segment or out and back trip.
Reserving Energy to Return
When you are at a destination that does not have charging, even when you reserve enough energy for local travel, its important to have enough energy to return to the last charging point. The EVTO application has such a feature. It will determine how much energy is required to go back to the last charging point, even stopping at other non charging waypoints along the way, in order for you to make it safely back within your minimum reserve.
This calculation performs the same way that was used to determine how much energy was required to get to the destination, but does it in the reverse manner. So for example it treats the affects of wind in the other direction as well as elevation gains or losses. It is not just a simple doubling of the energy required to get you to the destination.
To plan for a return to your last charging point in the energy calculations, select the destination pushpin and press the Edit button. The Edit Waypoint popup dialog will appear. Check the Plan last charging stop for a return trip checkbox. Press Save and the application will recalculate your trips energy needs.
Once this is complete you can select the pushpin at the last charging point to see the energy reserved for the return trip. Notice now that the battery has two SOC % values. The first is when you first arrive at the waypoint and the second is on your return trip. You may also see two different colors on the battery if the SOC % are different. Also of note is that the destination pushpin with show the distance with x2 to show that you will need twice the distance for this waypoint.
Favorites and Dislikes
There are two features within the app to describe the waypoints (stopping places) that you would like to use over and over (Favorites) and the Superchargers you would prefer not to stop at, if possible, the Dislikes.
Creating and Using Favorites
Favorites are indicators you apply to any waypoint (locations that you want to stop at or chargers you use frequently). When you mark a waypoint as a favorite, you can quickly create new waypoints or define the origin and destinations easily without having to search the address or place names.
To create a favorite just pick a waypoint (or a required charger) and at the top of the Infowindow you will see the outline of a heart icon. To mark this waypoint as a favorite just touch the heart icon and it will turn blue. To remove the waypoint as a favorite, retouch the blue icon where it will turn back into a outline again.
To use the favorite waypoint on a New Trip or Waypoint, just select the solid black heart icon next to the address field and a list of favorites will appear. Simply select the favorite from the list and the details will be filled into the panel for you.
Disliking Superchargers
There may be some superchargers that you never want to stop at unless it’s absolutely necessary. Either because they are slower, more crowded, or you just don’t like the atmosphere. Whatever the reason, you can dislike superchargers.
When a supercharger is disliked, the application puts a time penalty on it. During minimal time route optimization, these superchargers will incur an extra time over and above any charging time required. This may have the effect of choosing other chargers in range that would be better in an ideal world, but actually might be better based on the experiences you have encountered.
To dislike a supercharger simple select it’s icon then select the Thumbs Down outline which will turn red. To remove the dislike simply reselect the red Thumbs Down icon.
Note: You can only dislike unassigned superchargers in a particular route. So if a supercharger has been allocated and you want to dislike it, just select the supercharger icon and then the select the Remove button on the Infowindow. Then with the superchargers shown, select the icon from the map and this time the Infowindow will appear with the Thumbs Down icon.

Maintaining Favorites and Dislikes
While you can remove both Favorites and Dislikes by selecting their icons within a route, you can also do this outside of a particular route. Simply go the the main menu and select Maintain Favorites, the Maintain Favorites popup menu will appear. At the top of the popup panel is a navbar with a heart (favorites) and thumbs down (dislikes) icons. Selecting either will show you a list of each of these items. To remove an item from either list, just select it.
Trip Tuning
You can tune your trips with the application to increase their accuracy. Tuning can take place from a variety of places within the application. This section will cover the major capabilities within:
- My Cars
- Settings
- Edit Trip Details
- Waypoint features
My Cars
You have already seen the My Cars feature when you initialized the application. Check to make sure each of your cars features are set correctly. The tires, wheel sizes and drive motors along with the model type can make a large difference in the optimization estimates. In addition you can set the battery life percent for older cars whose range may have diminished.
Also check any special characteristic for your car such as the Model S pano roof or the Model X rear climate controls. For the Model X, if this item is checked along with a substantial payload, it will factor in additional energy required to condition the rear of the car.
Settings
While we described the location and regional aspects of settings above, there are other choices that can affect the trip estimates too.
- Mentioned many times above was the SOC Reserve. You should set this to the lowest value you feel comfortable with. Extra energy during the trip when you are charging is just a waste unless it is consumed before arrival to the next charging waypoint. The default is 15% which gives good performance. A setting of 20% or more is usually wasteful and a setting of 5% or less is living on the margin. I would suggest leaving it at 15% until you have more experience with the application with various trips.
- The Default Origin SOC is the value your car is expected to be charged at when you start each segment (daily origin) of a trip. Generally charging to a high value does not affect the overall trip time since you are not waiting on the car to charge. The default value is 90% but this is one case where it could help to charge to 100%.
Note: On Out and Back trips (covered below) the destination SOC automatically defines the return segments starting SOC. You cannot alter the return segments SOC nor will it utilize the default origin SOC described here except for the start of the trip.
Edit Trip Details
On the Edit Trip Details panel you can change the name of the trip. You can also set the trip departure date and time. The date and time will not only indicate your start time, but are used to calculate your estimated arrival time to waypoints and to use the appropriate weather forecast for each leg of the trip based on waypoint departure time. Since the weather changes constantly, it’s best to have the time set correctly in order to use the correct forecast at each waypoint.
Note: Selecting the clock icon on the main panel resets the trip date and time to the current date and time and then obtains the latest weather and recalculates the trip for you automatically.
The Payload should reflect the weight of all passengers and cargo. In split zone systems like the Model X, it also determines the impact on the climate control system, accounting for the second HVAC system if chosen in the Settings panel. The climate control energy is determined by both the cabin temperature and the weather forecast en-route for each leg of the trip. The Origin SOC is where you can override the default you set in Settings.
The Destination Reserve is the distance you will want to travel while at the destination independent of travel energy as was mentioned above.
The Power Factor is a sliding scale number that represents the aggressiveness of your driving style for this trip. Normal is a setting of 0. If you find the application constantly overestimating the energy losses then you should move the slider a few points to the negative side. On the other hand, if you find that the application underestimates the energy use, then move the slider to the positive side.
Note: Setting the Power Factor makes the value the new default for trips going forward but will not affect any trips already planned unless you update those power factors also and manually recalculate or optimize from the Plan Trip menu.
Pro Tip: For those towing trailers, if you change the power factor to a number greater than 0, you will find that the energy required will increase without changing the speed and therefore the routing times. You can increase the power factor up to a unit of 6 which should be sufficient to match the energy use of even the largest of travel trailers.
Edit Waypoint
There are two factors on the Edit Waypoint popup that can affect energy consumption, at least indirectly.
- Minimum Stop Time
- Minimum SOC
The Minimum Stop Time is the amount of time you wish to stay at this waypoint. Any charging time, if appropriate, will be subtracted from this value. This time can affect your departure time and thus will change which weather forecast is used in the calculation. Since weather is a big factor in the applications modeling, this could play an important role in determining energy requirements, charging and routing. Note that increasing the time beyond any projected charging time just delays your departure. It does not mean you will be charging longer. See the next item to change the charging time.
The Minimum SOC is simply a number that allows you to override the suggested charge amount. Unless you are certain you need the additional energy, it is unwise to enter a value here larger than your default reserve SOC. Charging longer than usual just wastes time as you charge for potentially unused power. You can lower this number if you feel comfortable that you have the margin to get to the next waypoint.
Duplicating & Finalizing Trips
Duplicating Trips
Once you have a trip defined, tuned and ready to travel you might find it useful to duplicate the trip. This is a Pro feature. This can either be to copy the trip in order to try different scenarios like charging times and locations, or even different routings. There are two ways to duplicate trips in the TTO application:
- Copying trips
- Copying and reversing the trip
Both scenarios are accessible from the Plan Trip panel popup menu (Pro Version). In either case an exact clone of the trip you have active will be performed with the same (copy) or reverse routing. The weather will be updated with the current forecasts. Just select either method and confirm with the popup dialog when prompted.
Note: Only non automatic waypoints are copied. You will need to optimize each trip segment after a copy if there were automatic waypoints on the original trips. Each trip segment will need optimization and you should optimize them in order starting with the origin segment first.
Finalizing Trips
You can finalize a trip by rating it. Prior to finalizing all trips are tagged as Plan. Trips that have been completed are Taken. Use the Rate Trip menu option in the Plan Trip menu to both rate the trip after it has been taken as well as to demonstrate it is no longer in planning.
Continuation Trips
One of the most powerful features of the EVTO application is the ability to create and manage a series of trip segments into a multi-day trip. For example going on a long vacation. This is Pro feature.
These trips segments have a natural termination (destination) for each segment that becomes the origin for the next trip segment. In this way you could drive to an overnight (or multi-day) stop, and then when ready, start where you left off. You even have the option of having the application carry your SOC over for the next day or to simply start with a full SOC by editing the next segments origin.
Creating a continuation trip is easy. You start with an active trip in the Plan Trip panel. Once you have the destination confirmed you use the New Trip menu item to start a new trip segment. Just select the checkbox labeled Continue the current trip.
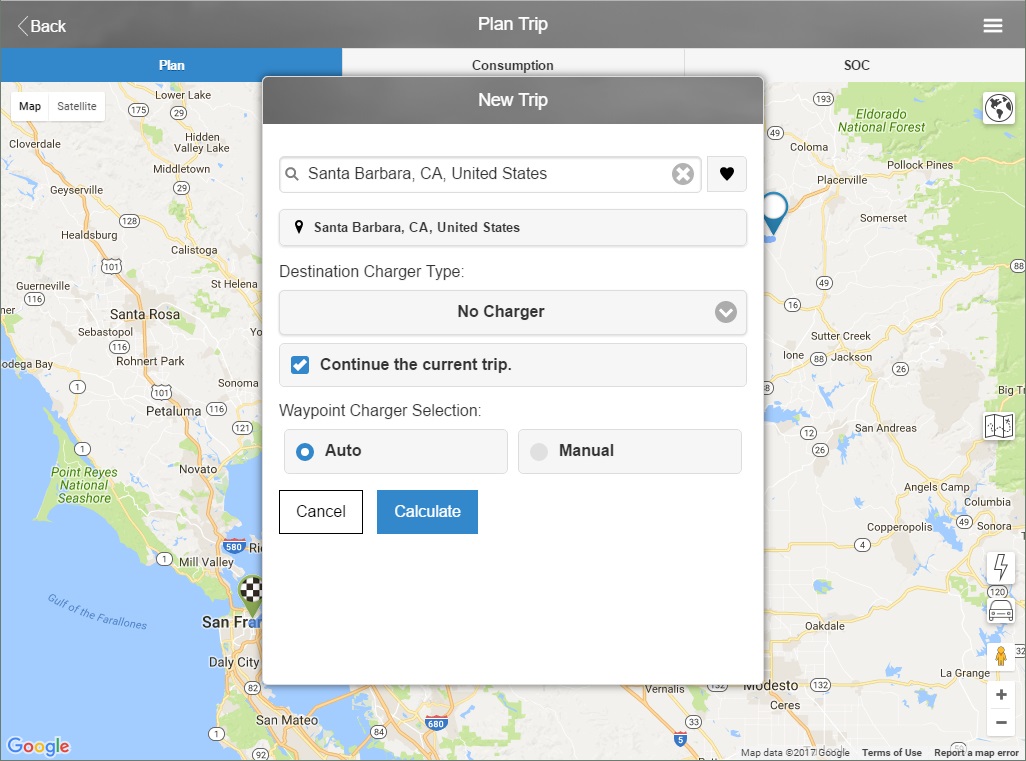
Just like any other trip you start by entering an address or place name and choosing the matching location. You can change the name of the trip segment if you wish in the top input box (see example). You can also indicate there is destination charging at this stop which will force the application to indicate your car will be recharged to your default origin SOC as depicted in the settings panel.
The big change on this dialog is the addition of the Continue the current trip checkbox. By checking this box the application will bind this trip segment with all other trip segments that are part of a master trip. Destinations and origins will be intrinsically locked. Changing a destination will automatically change its paired origin and vice versa. The application will also do its estimation and summary reporting at both the trip segment and overall trip levels.
Note: You cannot continue Out and Back trips and they are limited to two trip segments (see below).
Select Calculate to create this new trip segment and bind it to the current trip segment where the current trip segments destination is now the new trip segments origin. When the application saves the trip segment a new route is shown in blue. The former trip segment, and all other non active segments, are shown connected to it in gray.
Add waypoints just like you would do with any other trip. You can continue adding trip segments until your trip is complete, often returning to the original trip origin. Waypoints are only visible on the active trip segment. Note that the trip origin and destination icons (gray if not on the active segment) will always display so you can easily see where each segment starts/ends.
Pro Tip: You can create complete loop trips with this feature. Just make sure the last destination is exactly the same location as your origin for the trip. This is a good application for the Favorites feature.
Note: You will need to optimize each trip segment separately. To remind you of the need to calculate or optimize, the new trip segment destination icon will be shown in white. This also occurs anytime a previous segment is optimized.
Listing and Activating the Trip Segments
There is an small map icon on the center right of the map with a small red circle in the upper left corner with a number in it. The number represents the segments for this trip. Selecting this icon will bring up the Trips Segments Summary popup panel.
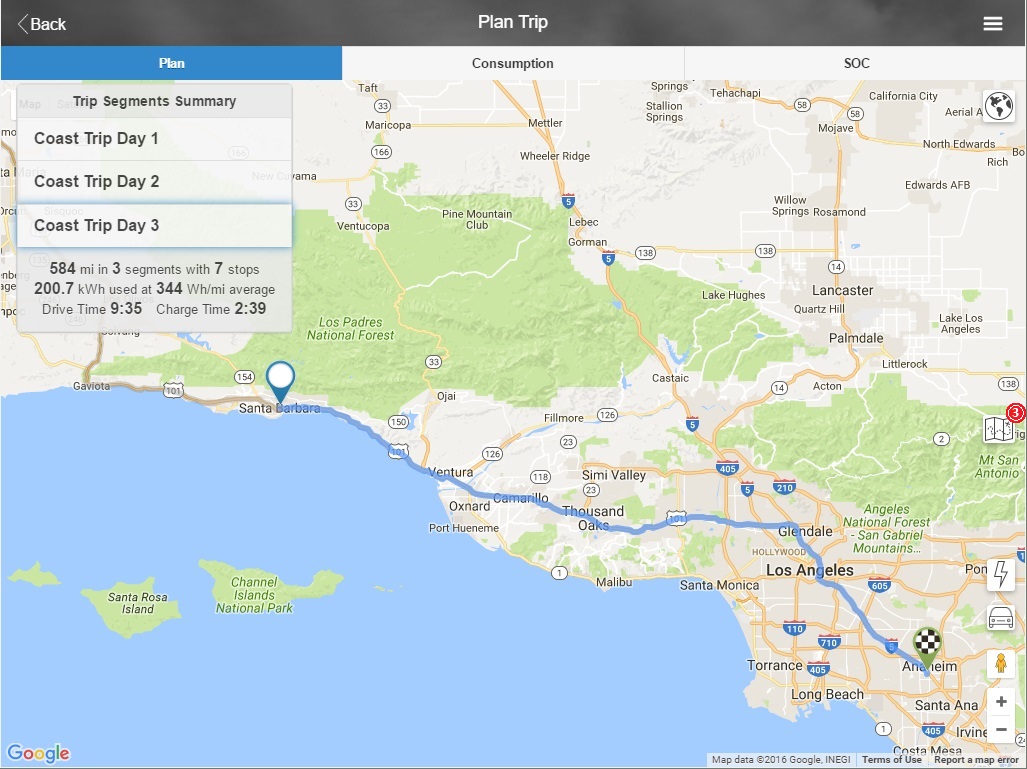
The Trips Segments Summary popup panel displays each trip segment in the order of travel from top to bottom. You can quickly move from segment to segment by selecting each item. The item will highlight and the map will zoom into that trips segments location. The active trip segment will now display it’s route in blue and the others will be in gray. The active trip segments waypoints will be displayed while the other segments waypoints will be hidden. You will note the prior segments destination is in exactly the same location as the current trips origin.
At the bottom of the Trips Segments Summary popup panel you will see the summary details for the entire trip including the total distance, the number of trip segments and total stops, the total trip energy consumption and average efficiency, the drive time and time allocated to charging.
Note: Like all continuation trips, you can move from trip segment to trip segment by swiping left/right on the two energy charts. You can also move between trip segments by selecting the gray route on the map for the non active segment.
Return Trips
Using the EVTO application there are many ways to approach trips that you take and want to get back to the origin. These are return trips. They can be done in three ways in the app:
- A continuation trip that starts and finishes at the same location
- A one way trip with a need to plan for recharging at the last charger (could be the origin)
- An out and back trip where the return route may not be the same as the outbound leg, but will share common endpoints
Continuation Trip
The return trip using the Continuation Trip feature is as described above. You manually create two trip segments: an outbound one, and then immediately afterward, you create a continuation trip back to the origin. Note that by default the origin SOC will be reset to your default value and you will have to decrease it if charging is not available. You may pick your own route back and add waypoints as you need to on either segment. You will optimize each segment separately. If you move the first destination it will automatically adjust the starting point for the return segment.
Return to Last Charger
On the edit panel for your destination is a checkbox labeled: Plan last charging stop for a return trip. By checking this option the application will determine how much energy you will need to get from the last charging stop to your destination, and also calculate the energy that would be required to get from the destination back to the last place you charged (it could be the origin). This is not simply the outbound amount doubled as it includes not only elevation but weather and road conditions too. And if you have a delay (you indicated there was a Minimum Stop Time), the weather could also be drastically different from the outbound leg. When you look at the SOC chart, you will see the trip has been extended past your destination.
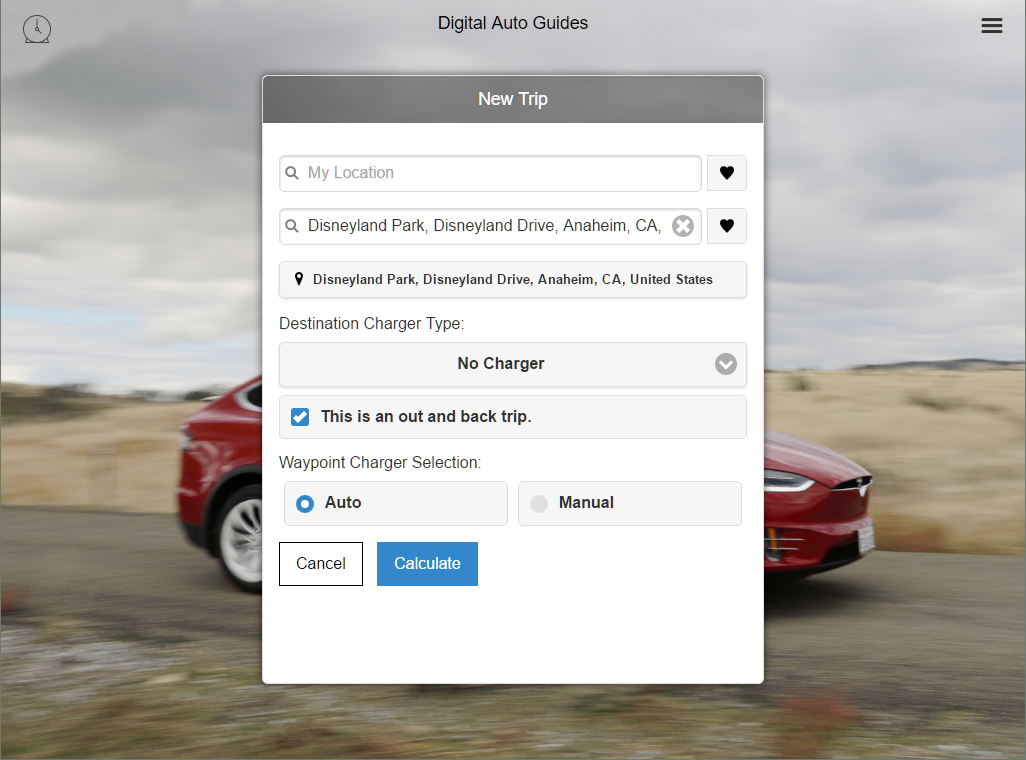
Out and Back Trips
Out and Back trips are a special version of a Continuation Trip and are created automatically for you when you create the trip. When you open the New Trip popup panel you will notice a checkbox labeled: This is an out and back trip. By selecting this checkbox, the application will know you intend to return to the origin as soon as you leave the destination. It will create two trip segments for you automatically that share destination/origin pairs. The application will also use the remaining SOC from your arrival as your exit SOC, subtracting any destination travel energy you may have reserved.
You will have to optimize both segments separately. On the second leg you will notice if you make any changes to the outbound leg, the second leg destination icon will be white indicating it needs to be re-optimized. The routing for the return leg may not be the same as the outbound leg based on the availability of chargers along the route and distance from the destination. The application could choose a different set of chargers outbound as it does inbound based on numerous factors. You may also add waypoints on either leg that will only be used on those segments. You can move between trip segments using the map icon at the right center of the map or the other techniques mentioned above.
Note: Like all continuation trips, you can move from trip segment to trip segment by swiping left/right on the two energy charts.
Note: The Out and Back option will attempt to add a supercharger near your route on the outbound leg if it feels you will need to charge on the return segment. This insures you are not forced way out of your way in order to gain enough charge to head back in the same direction you came from.
Note: You can dramatically influence the route taken by changing your SOC at the start of the trip.
Note:When the existing trip is a continuation trip or potential continuation trip, the Out and Back option will not display when choosing New Trip from the Plan Trip menu. You will need to go to the main menu to create an new Out and Back trip.
Long Distance Trips
An extension of the continuation trip feature is planning for long distance trips. Using a feature of the EVTO application to segment (cut in parts) existing trips into continuation trip segments, It’s easy to create long distance trips rapidly when you have a good idea where you want to stop for the night.
Begin your long distance planning by starting a new trip. If you start the trip from the Plan Trip panel, do not select the option to continue the current trip. In this case the trip will be a brand new trip. Enter your final destination for the trip (assuming this is a one way trip). Once your trip has been created you will see your origin and destination spread out over a long distance. Don’t worry about the routing at this point as we will fix that in the next step.
Note: If your trip will be a loop trip, this technique will not work. It can only be used for linear trips. You will have to use the continuation trip as described above.
Select the Optimize button from the menu. After a few moments you will see chargers placed along your entire route.
Now enter a waypoint for each planned overnight stop. These are the places you will want to spend the night.
Pro Tip: Use the Trip Summary menu item (Trip Waypoints popup dialog) to see what the running or elapsed time is for each waypoint since the last overnight stop. This will help you decide where you will want to stop for the night and indicate a natural place for a trip segment to occur based on overall trip segment time.
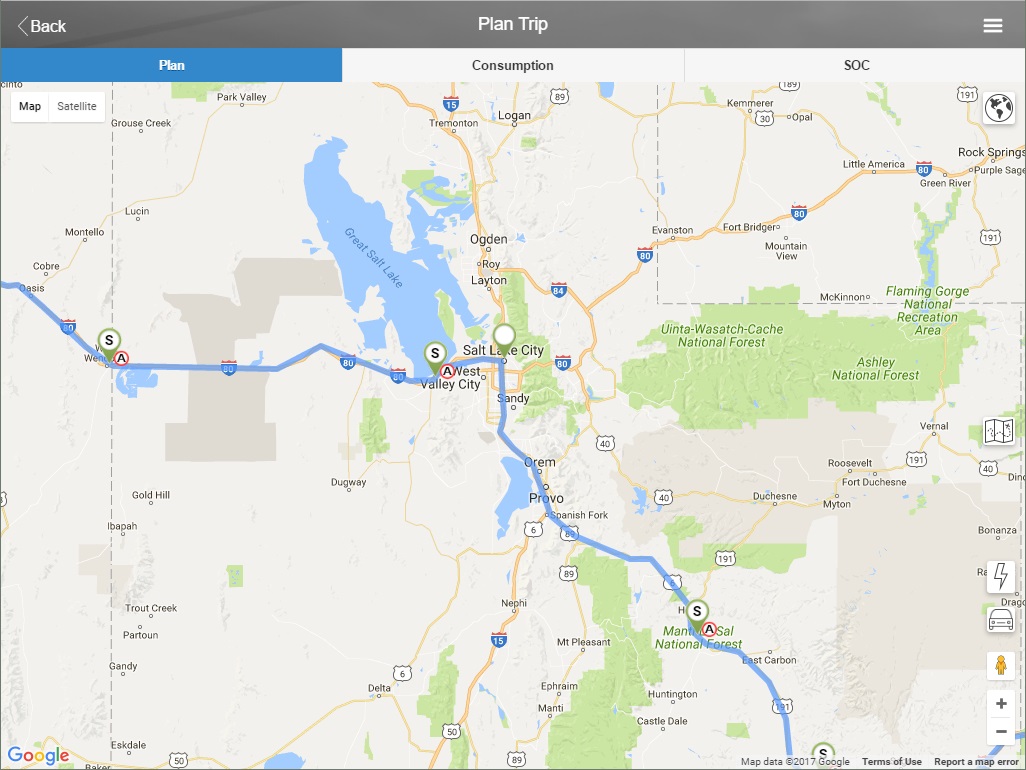
As is shown in the figure above we have added a waypoint (Salt Lake City) as one of our nightly stops. Its best if you can use the exact address if known, otherwise you can just enter the cities and update the overnight destination later with the specific address when known as we showed you in exercise two.
Note: If you update a destination in one segment, it’s paired origin and all calculations will be adjusted automatically. You may need to reoptimize if the destination if far from the original destination, but otherwise the application will automatically recalculate the energy needs and routing.
We can next work on each trip segment, adding nightly stops as we go. To do that though we have to divide (segment) our trip into individual trip segments, a destination/origin pair for each overnight spot.
The EVTO application makes this easy to do. To segment the trip select an overnight waypoint pushpin. The waypoint InfoWindow appears. Notice that there is a new button on the InfoWindow named Segment. The purpose of this button is to cut the trip at this point and turn the trip into two trip segments, where this point terminates the first trip segment and starts the next trip segment. It also locks this waypoint as a destination/origin pair.
Note: Don’t worry about the charge states until you have chosen all of your overnight stops. You can then decide if you just want to calculate (most likely and quicker) or optimize each segment (probably not needed but acceptable).
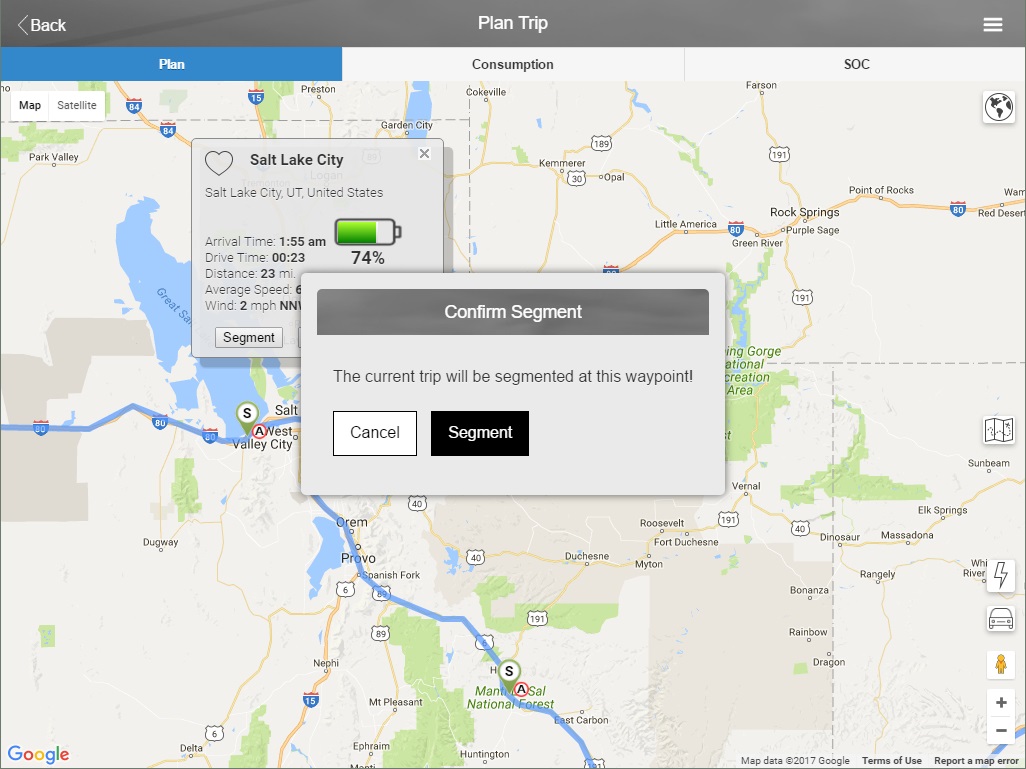
Select the Segment button on the confirmation screen and the trip will be segmented. You can continue this process until you have reached the last waypoint before your destination. Now use the Optimize menu item on each trip segment to insure each segment has the best charging model.
Pro Tip: You can either preload the prior charging stops if you want to be exact, depending on where you will destination charge, or let the application assume you will be charging at your destination and use your default origin SOC.
Calendar Interface
One of the most useful features of the EVTO application is the ability to integrate the trip waypoints into your mobile devices calendar. From here, if you have your mobile devices calendar synchronized to the Tesla, each waypoint will become a route-able destination in the cars navigation system. You will not have to enter any destinations and this effectively provides waypoint support for the Tesla navigation system. Note this is a Pro feature.
The calendar entries include the name of the waypoint, the waypoint address that is navigable by the Tesla automobile and the duration for each waypoint including charging times and any additional wait time you have specified. The calendar entries are also set to the estimated time of arrival to that waypoint.
To populate the calendar with the current trip segments waypoints, just select the Add to Calendar menu item on the popup menu in the Plan Trip menu panel. You will be presented with a confirmation panel to insure that is what you want to do.
Refreshing the Trip Times and Estimates
To keep the calendar entries and trip estimates accurate, we have provided a simple icon on the main panel that will reset the trip start date/time and recalculate the trip for you based on the latest weather and road conditions. Look for the little clock icon on the upper left of the main panel. Pressing this will take you to the current trip and recalculate the trip based on the time you pressed the icon. You can then re-select the Add to Calendar menu item to refresh the calendar entries on your mobile device and synchronize these changes to the Tesla for updated navigation. In addition, if you make any waypoint changes to a trip segment, you will need to redo the calendar entries using the same technique. Any deleted waypoints will be removed from your calendar and additional waypoints will be added for you automatically.
Compare Trips
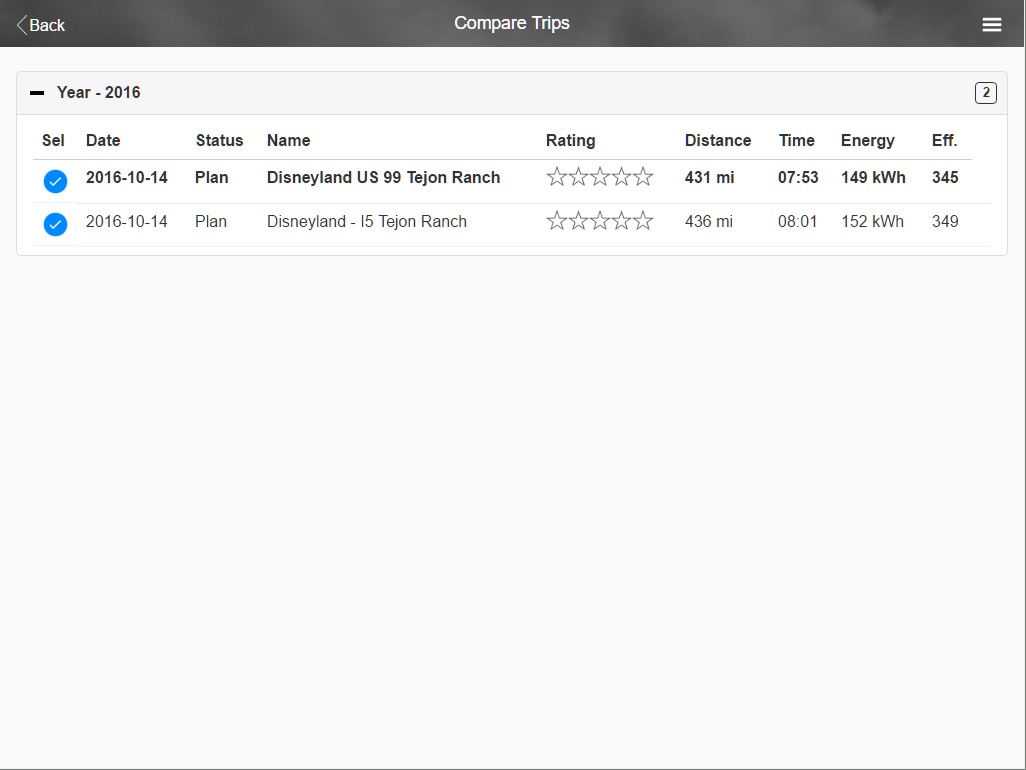
We have already seen how using the EVTO application can help you optimize your trips with it’s complete energy and travel calculations. You also saw how making adjustments to waypoints, SOC and various parameters could influence the optimal trip. But how do various versions of the same trip compare to each other? What if you went a different route? Could a longer route have a shorter trip time even if you had to drive slower? For these types of questions we turn to the Compare Trips feature, found in the main panel popup menu. This is a Pro feature.
Start your comparison by selecting the Compare Trips menu item. Next select the trips, or trip segments, you want to compare. You can use the various sorting methods of name, travel date/time and rating. The empty circles act like toggles changing to a blue check when selected. You can select as many trips, or trip segments, as you want to compare.
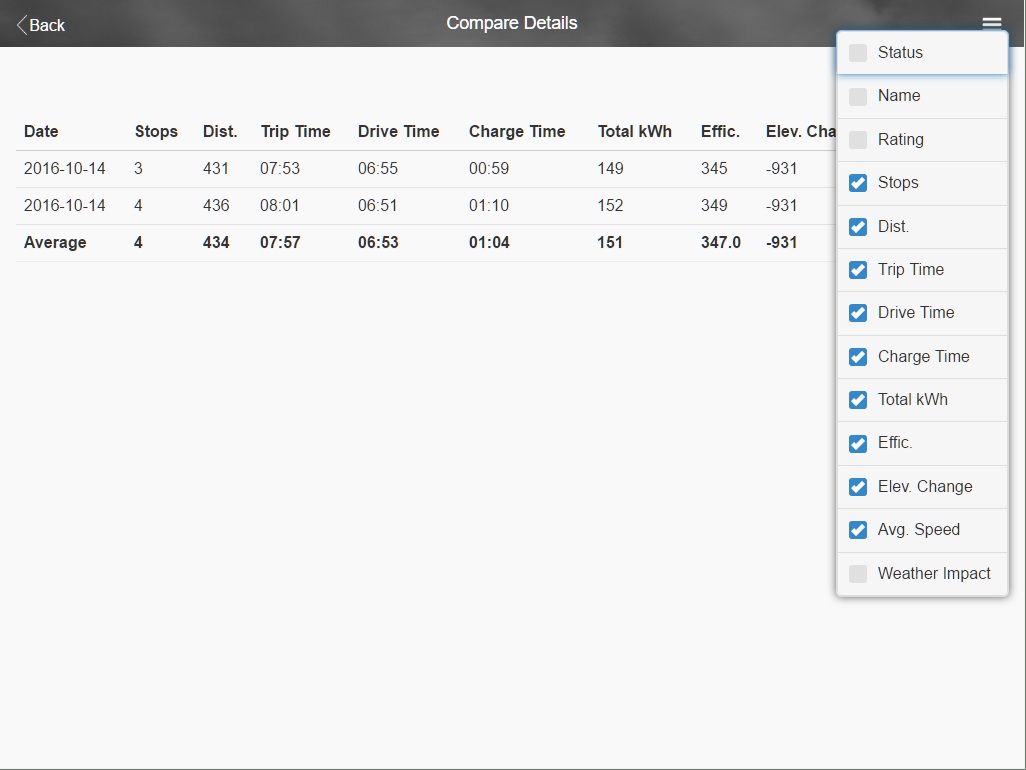
Once you have your trips, or trip segments selected, use the Show Details menu item. Review the tabular data to see trends or compare characteristics. You can select which items you want to view from the Columns menu item and resulting popup panel.
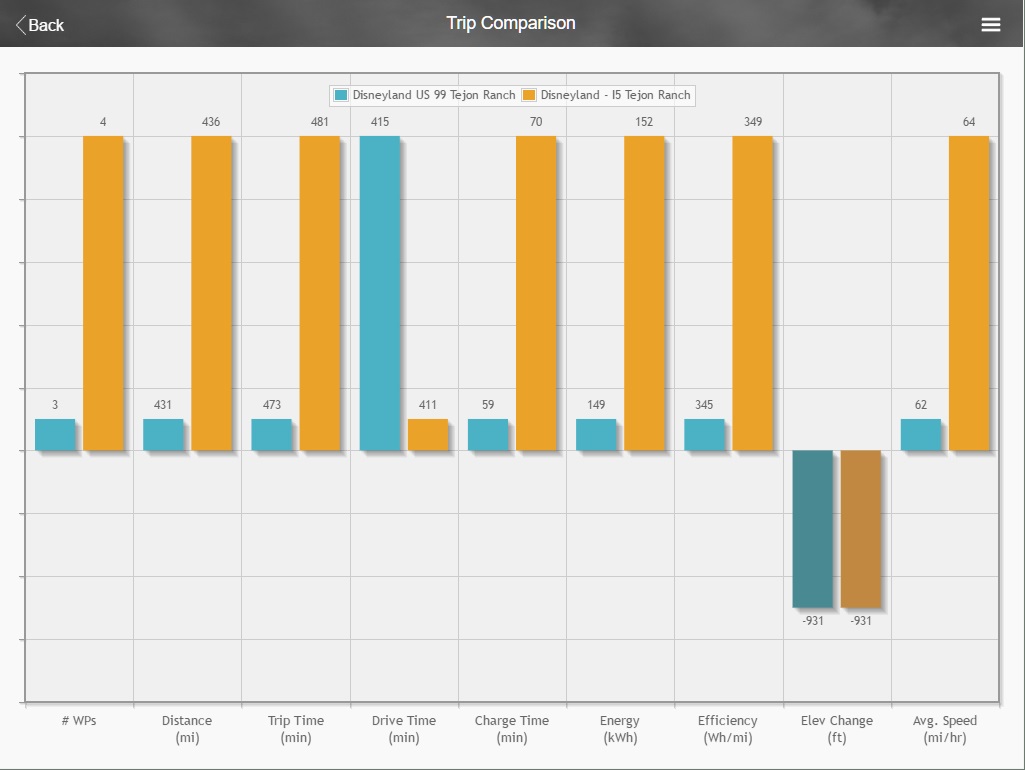
You can also analyze the data in a graphical manner using a column chart. Select the Show Chart menu item to display a chart with your chosen trips and selected columns.
Manage Trips
Now that you have seen how to use the trip optimization and planning features to help you plan and optimize your trips, you should be aware of how you can manage the collection of trips that you have created. The EVTO application uses local storage on your device to keep track of all of the trips you have planned. Periodically you may want to delete or archive some of these trips that you are not currently using in order to make the application easier to use.
To manage your trips you have two resources within the application:
- Current Trips – a collection of trips you are utilizing and are planning on changing/viewing
- Archived Trips – trips that you are not currently utilizing but would like to retain for possible future use
Both of these lists of trips are accessible from the main menu.
Current Trips
To access the current trips select Current Trips from the main menu. The Trips panel will appear.
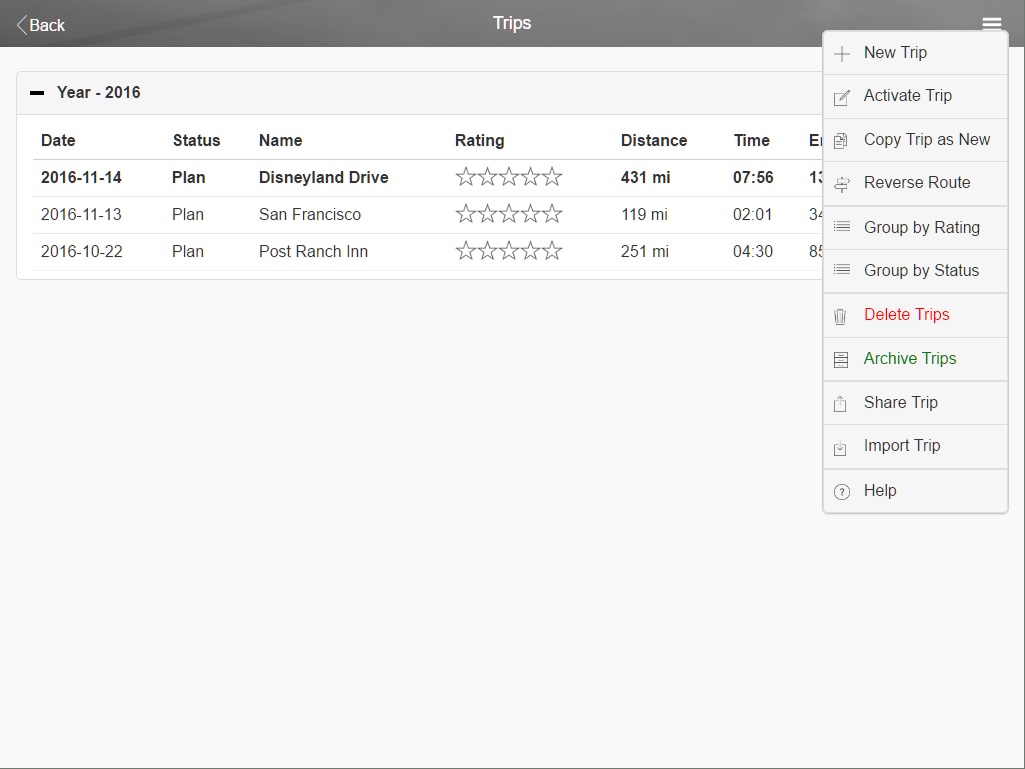
In the Trips panel you can:
- Create a new trip
- Activate one of the trips listed so you can edit or view it
- Copy a trip as a new trip
- Copy a trip as a new trip but reverse the route
- Group the trips in the list by name (default), rating or status (plan or taken)
- Delete one or more trips
- Archive one or more trips
- Share a Trip
- Import a Trip
- Get Help on the Trips panel
If you select any of the trips action menu items, a small circle will appear next to the trip. If you select the circle a blue check will appear, or a red minus if you chose Delete Trips, in place of the empty circle. All of the trip actions except for Activate and Share will allow multiple selections. The Import Trip has no selection.
When you have made your selection, select the appropriate action button at the top of the panel or Cancel.
Note: Delete Trips is a permanent action and there is no way to recover these trips so be careful. You will be prompted to confirm your action before any trips are deleted.
Archiving Trips
Archive Trips is not permanent and only tags the file so it can be hidden in the Trips panel and shown in the Trips Archive panel where it can be restored to the Trips panel once again if needed. You can use the Restore Trips item in the Trips Archive menu for this purpose.
You can sort the archive trips in the same manner as the current trips. In addition you can permanently delete one or more trips from the application as well from this panel.
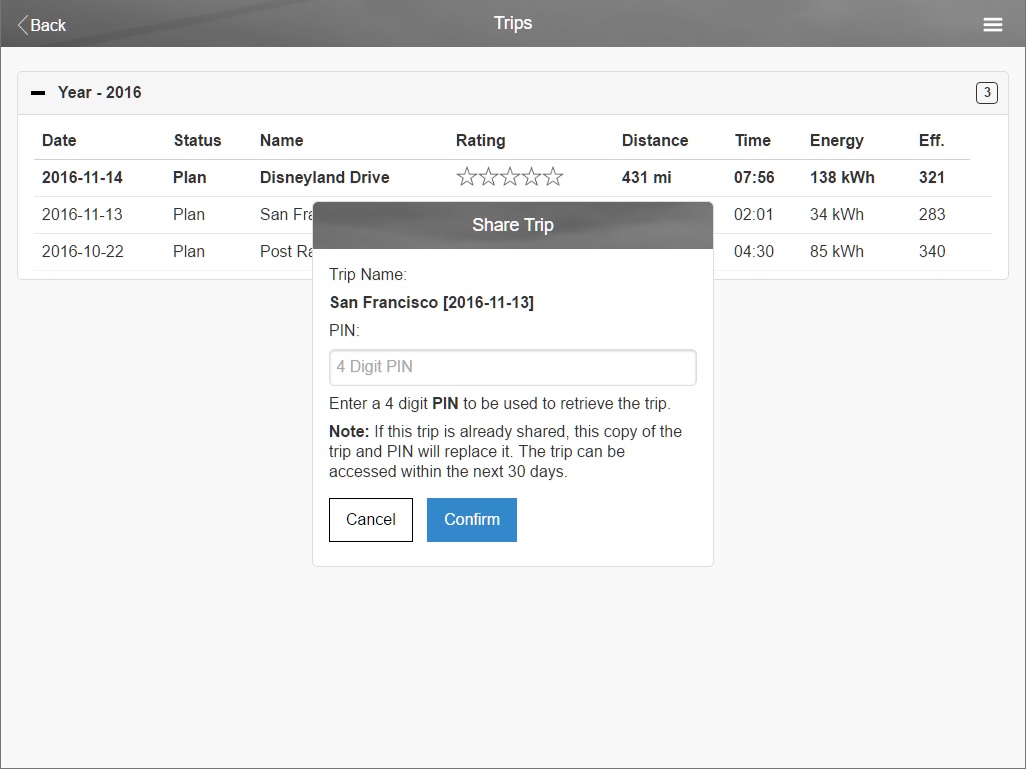
Sharing and Importing Trips
You can share your trips with other EVTO users from the Current Trips panel. Use the Share Trip menu item to select a trip to be shared. Once you have selected a trip and pressed the Share button, a popup panel will ask you for a 4 digit PIN. Enter the PIN of your choice and then select the Confirm button. An email will be created with the unique Trip ID and your PIN which you can share with other users of the EVTO.
To receive a shared trip you will need the unique Trip ID and PIN and use the Import Trip menu item. Copy the Trip ID and PIN into the popup panel. If the shared trip is still on your mobile device, you will be prompted before the trip is overwritten.
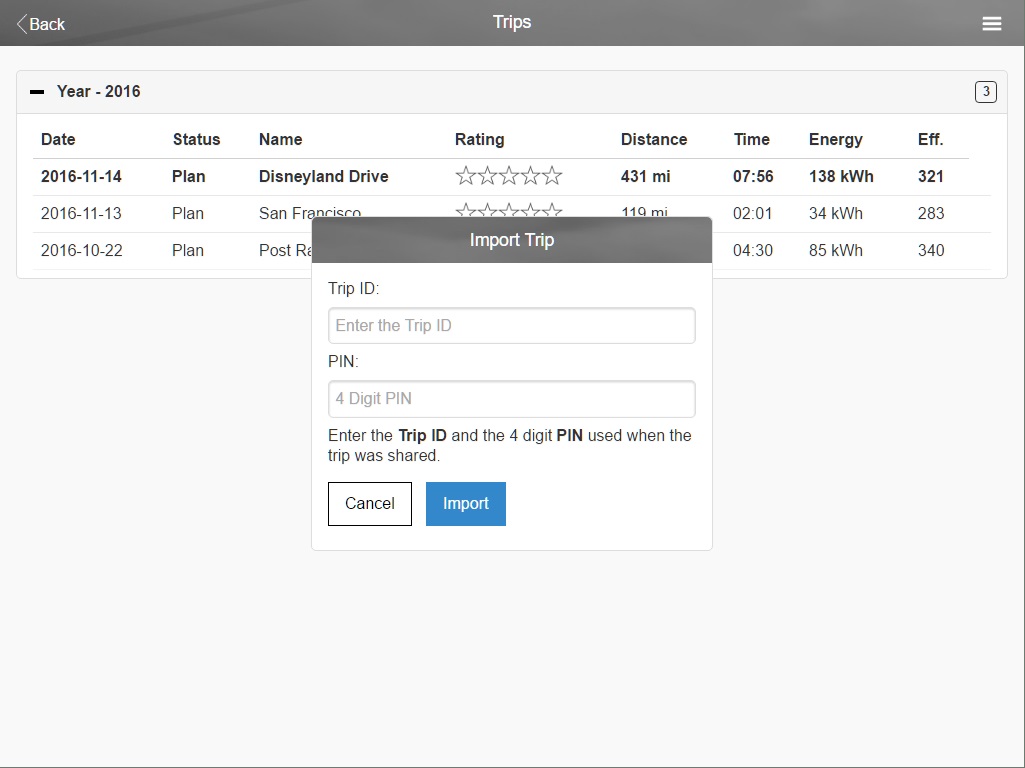
Note: The trip is copied to the cloud storage for up to 30 days, after which it will be deleted. Your trip will not be affected by any changes a user makes to their copy of the same trip, but if they in turn share the trip, the stored copy in the cloud will be replaced with their version. You may also loose access to the shared trip if they use a different PIN to store the new version.