Route Planning: Planning Multi-day, Multi-segment Trips
How to use EVTO to plan multi-day trips that are made up of individual daily trip segments.
The Big Picture
In addition, with the small form factors of a mobile device you will utilize on the trip, it is important that only the information pertinent to your active trip segment takes precedent, while the rest of the trip information is active from a simple touch. A trip with dozens of waypoints would be impossible to display effectively on mobile phones. Using a different trip segment for each day allows EVTO to not only be more accurate in depicting your trips characteristics for planning, but also allows you an effective user experiencing on your mobile device. While larger form factors are great for planning, they simply won’t work effectively on smaller mobile devices. EVTO’s unique set of features and user design allows for both situations; planning and en route reference.
In this tutorial we will explain how to most effectively use EVTO to plan for an extended multi-day road trip using the segment approach unique to EVTO.
More information on EVTO’s use of trip segments can be found at All About Trips, Routes and Segments.
Note: This tutorial assumes you have installed at least EVTO Version 3.5 and have a subscription active in order to utilize all of EVTO’s services and capabilities.
My Cars dialog with the Other tab selected
Step 1: Configuring EVTO
Driving an electric vehicle long distances is not difficult but does require additional planning. This is obviously one of the major reasons you have elected to use EVTO for your EV trip planning purposes. Not only do longer multi-day trips require overnight stays, but with an EV, you have to understand how charging will affect your travel times. By using EVTO you will not only understand the various impacts common with EV road trips, but EVTO will attempt to insure these impacts are at a minimum while providing you information that will be invaluable as you take your trip.
When planning multi-day trips there are a few features that you may want to configure in EVTO to help you during your planning exercise:
- The maximum amount of time you wish to drive between charging stops
- The maximum amount of time you wish to travel each day
EVTO can take both of these attributes into its planning process and are unique to each of your car profiles. For example you could have one car profile set for daily commuting and another set for long road trips. Each with a different set of these attributes.
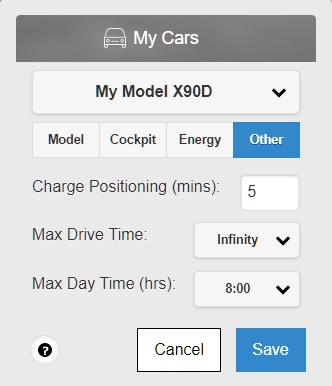
- Select My Cars from the main menu
- Choose or configure the car profile you will be using for multi-day road trips
- Select the Other tab from the top of the popup panel
- Choose Infinity in the Max Drive Time from the drop down selector
- Choose 8:00 in the Max Day Time from the drop down selector
- Select Save to capture these values
The choice of Infinity in the Max Drive Time will mean that for this tutorial EVTO will only define it’s charger selection based on the optimization model you have selected. Choosing a time value would force EVTO to look for chargers that can be accessed at or before that time, even though a more distant charger could make the overall trip time more optimal.
Note a setting other than Infinity could result in no chargers being available within that travel time and thus having EVTO not finding a suitable route. Be careful when using a setting other than Infinity.
The choice of 8:00 in the Max Day Time will inform EVTO that you do not wish to travel for longer than eight hours in any given day. EVTO will utilize this in any feature that plans your days overall travel times including driving, charging and additional waypoint stop times.
New Trip dialog showing origin, destination and manual waypoint charger selection
Step 2: Input your start and end locations
For this trip we will be taking a multi-day trip to Moab, UT from San Francisco, CA. We will assume that we have very little experience in driving long distances with our Tesla and are uncertain how much distance we can accomplish each day with charging and stay within our daily travel time goals.
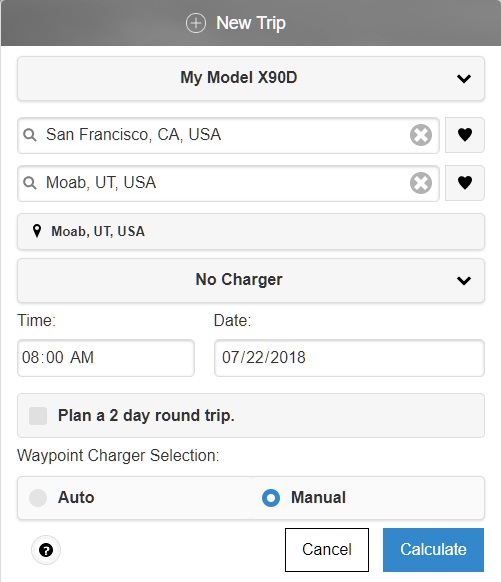
- In EVTO, select Plan a Trip from the Main menu.
- Origin: type san fran. From the list of results, select San Francisco, CA, USA.
- Destination: type moab From the list of results, select Moab, UT, USA.
- Since we’re planning a multi-day road trip leave Plan as a round trip unchecked.
- Waypoint Charger Selection: Manual. We’ll let EVTO automatically select the optimal charging points after we’ve laid in our overnight stops for the entire trip.
- Touch Calculate.
In a few seconds EVTO will display a map with our multi-day trip routed without any charging stops. Notice the red destination pushpin indicating we don’t have sufficient charge to make it to Moab without charging along the way. This trip is estimated to be 967 miles, take 14:20 hours of driving time and use 327 kWh of energy in our Model X 90D.
Note: While we chose Manual for the Charger Selection, you could also do Auto. You would add waypoints along the way with the same techniques that follow.
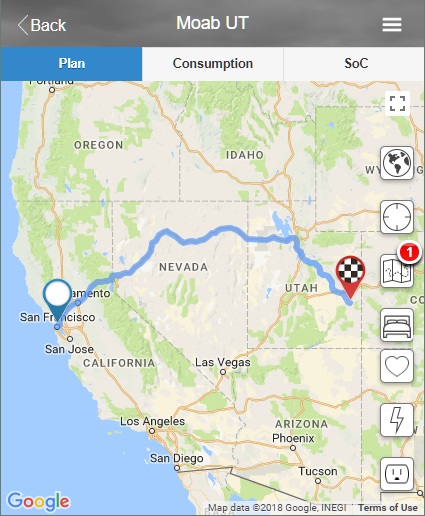
Out entire multi-day route with no charging stops
Step 3: Estimate the first nights stop
Even if we could complete the trip without charging, our bodies could not make it that far. We have limited our daily travel duration to eight hours. Lets see how EVTO can help us in this regard.
On the map panel you will notice a little map with a red (1) over the top right corner. This indicates that your current trip has one segment (San Francisco to Moab). Just below that icon is a small bed icon button.
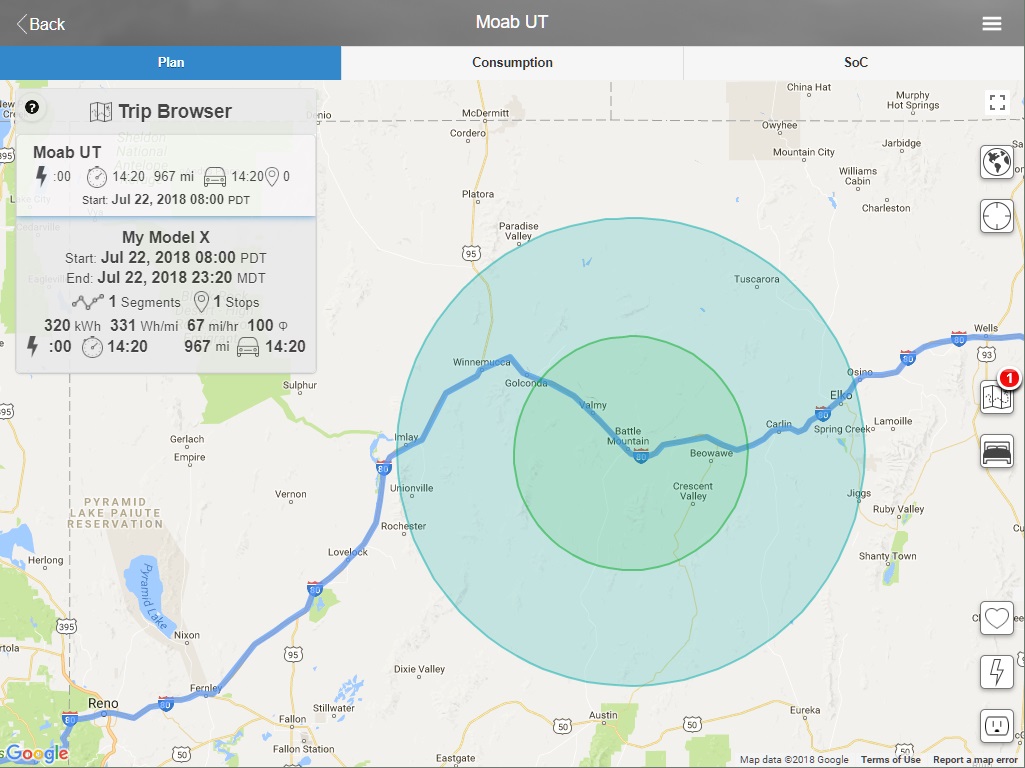
The Segmentation Suggestion circles at approximately eight hours of travel
By selecting this small bed icon EVTO will take your days origin along with your destination and determine how much time it believes will be required to not only drive to the destination but charge adequately along the route. In addition if you had any other waypoints defined for the day along with criteria such as minimal stop times or manually assigned charging stops, those times would be included in the estimate as well. It will show this estimated time, in this case eight hours, as two concentric circles. The center of the circles will be at the estimated daily trip time (eight hours in this case) where the radius of the inner circle is one half hour estimated driving time and the radius of the outer circle is one hour estimated driving time.
New Waypoint dialog with Segment trip here selected
Step 4: Segment first overnight stop
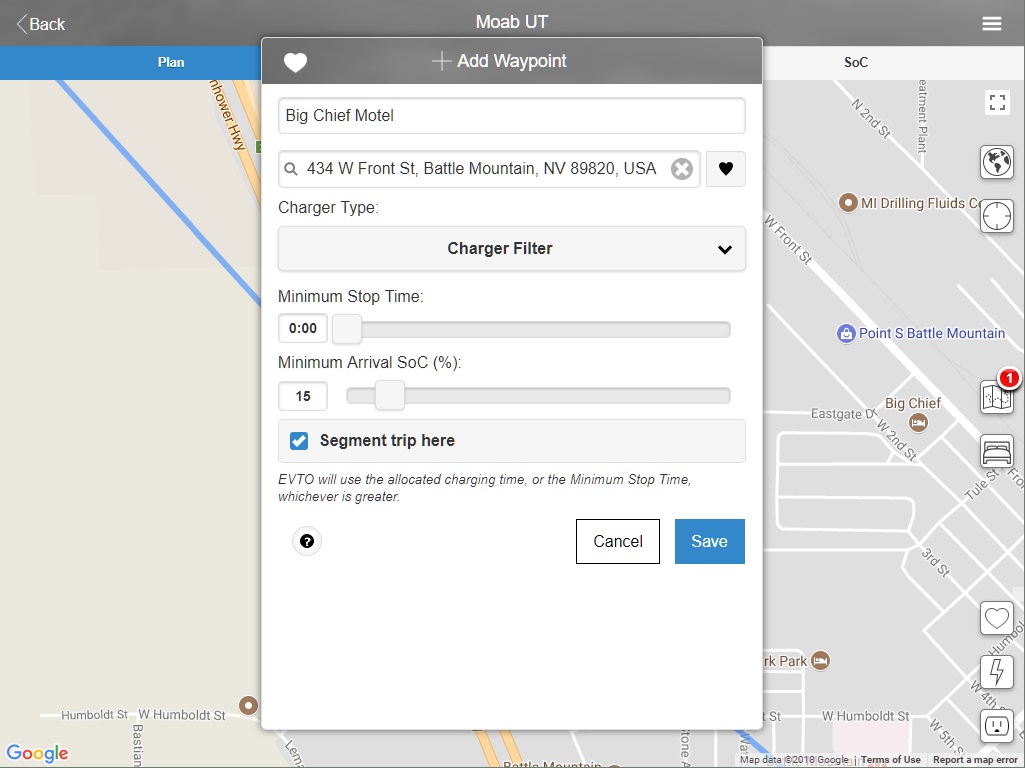
Those who have driven across Nevada will recognize it is wide open country with few amenities spaced miles apart. Using any travel application will demonstrate that Battle Mountain is our only choice within our cirles and has a number of possible overnight spots. We are going to select the Big Chief Motel as it meets our criteria the best. Unfortunately there are no EV chargers available in Battle Mountain, but no worries, EVTO will ensure we get in and out of town safely.
- Unselect the map bed icon, which is shown in filled in black to show it’s toggled state, to remove the colored circles.
- Now zoom into the map at Battle Mountain and just to the North West of the center of town, you will see a Google Place icon for the Big Chief motel. Select that on the map. The Add Waypoint dialog will appear filled out for that location.
- Check the Segment trip here checkbox.
- Touch Save.
After a few seconds EVTO will add the Big Chief Motel to your route and segment the trip at that location. You have now created an overnight waypoint and segmented the trip in one operation. Congratulations.
The first segment of the trip ending in Battle Mountain
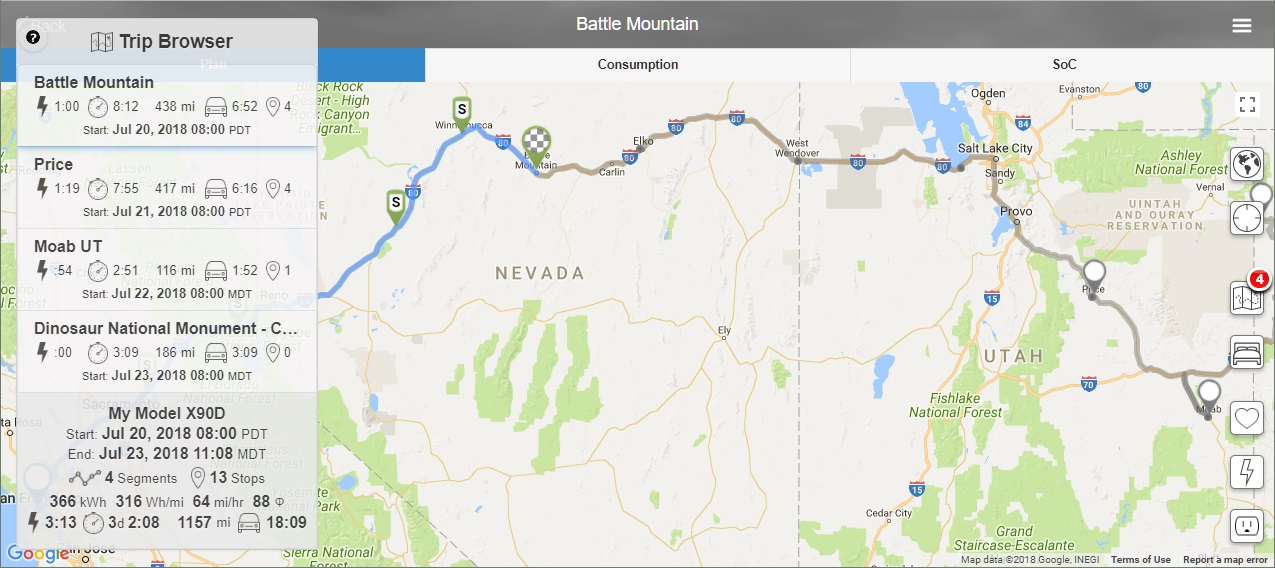
Step 5: Adding the second segment
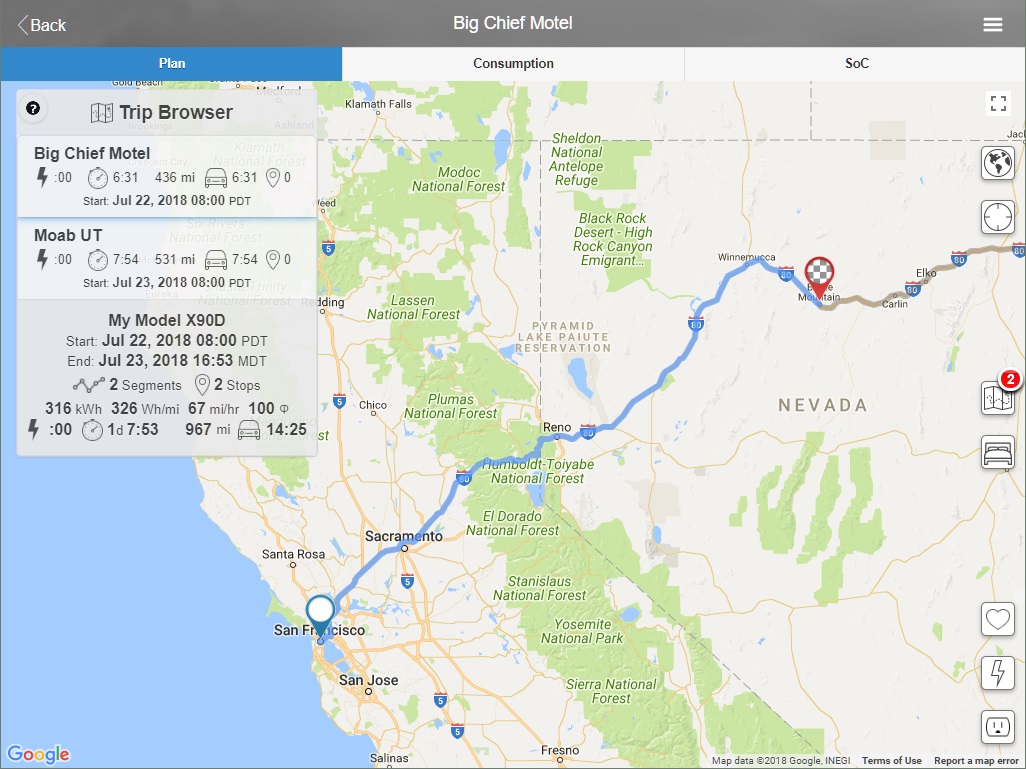
You will now notice that the little map icon button, which access the Trip Browser, is shown with a red (2). This indicates our trip has two segments. Looking at the Trip Browser we see that this first segment is 436 miles long and will take approximate 6:31 to drive. However this does not include the additional charging times which should get us very close to our daily eight hour limit. Just in time for a nice dinner at one of the fine eating establishments in Battle Mountain.
- Select the little map icon button with the red (2). The Trip Browser will display.
- Note the Big Chief Motel segment at the top of the list.
- Now select the Moab UT item. The map will switch to the second segment and zoom in.
- Select anywhere on the map to dismiss the Trip Browser popup.
- Select the bed icon once again. The circles will return around Price UT.
Note: An alternative way to switch segments is to select the gray route of any segment shown on the map. You can see your entire trip by a long press of the globe icon button on the map.
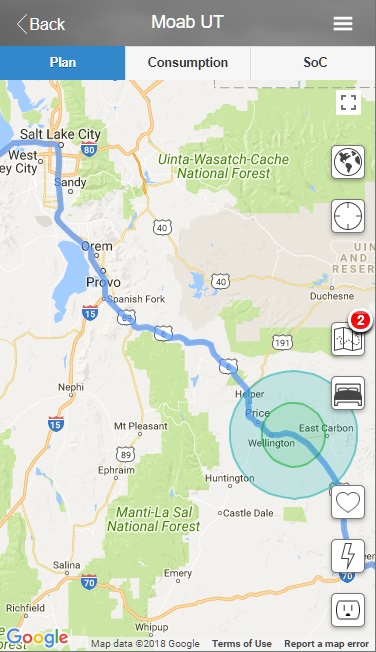
Our second day at eight hours of travel near Price UT
- Unselect the map bed icon, which is shown in filled in black to show it’s toggled on state, to remove the colored circles.
- Now zoom into the map at Price UT and just as you enter the town from the north you will see a Google Place icon for the Holiday Inn Express & Suites Price. Select that on the map. The Add Waypoint dialog will appear filled out for that location.
- Check the Segment trip here checkbox.
- Touch Save.
The little map icon now has a red (3) for our three days of travel to Moab. The map is zoomed into our second segment.

Our trip to Moab UT as three segments
Step 7: Filling in the chargers
Now all we have to do is to have EVTO fill in the charging stops and do the entire route planning. That is very easy to do by just selecting the Refresh Auto Chargers menu item. A few seconds later and the entire trip is planned for us.
We have now completed our planning from San Francisco, CA to Moab, UT and have determined it is a two and half day journey traveling eight hours a day. By not rushing and driving crazy long hours we are more rested and ready to tackle the next days drive. It also allows us to get in at each overnight stop at a reasonable hour without having to get on the road too early in the morning. Our actual driving time for the first two days is just over six hours and we plan on eating at the car while it is charging. The total extra charging time the first day is about an hour and just about an hour and a half the second day.
Since we had some extra time on the third day and were not expected until later in the afternoon, we decided to see some sights in Price UT. We found a great museum at the Utah State University Eastern Prehistoric Museum in Price. It was filled with an excellent set of dinosaur fossils from the area including Utahraptors, which were bigger and meaner than velociraptors and used as the basis of those dinosaurs in the film Jurassic Park.
Adding a segment to the end of an existing trip
Step 8: Adding a segment to the end of a trip
We have demonstrated how to create a trip from an origin to a known destination and then add waypoints to use as stop over points creating segments of day trips. An alternative to this approach is to take any existing waypoint and use the Waypoint Inspector dialog from it’s map pushpin and then segment the trip using the scissors icon button. It’s a few more steps but gives you the same results.
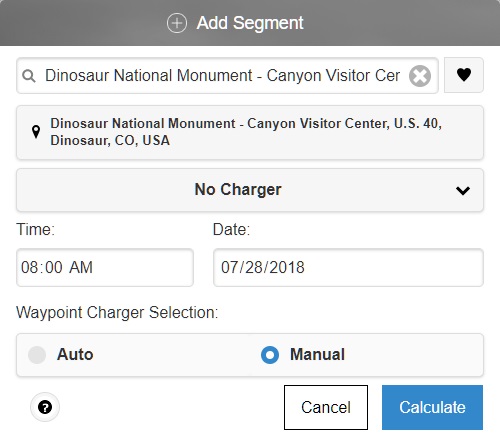
But what if you decide your trip is not over as you planned it and want to extend the trip? Well EVTO has that covered too. Remember that great museum we went to in Price UT with the dinosaurs? Well it turns out there is a national monument appropriately named Dinosaur National Monument just a few hours away from Moab. So we have decide to extend our trip after our stay in Moab and visit that national monument too.
To add a segment to an existing trip:
- In EVTO, select Add Segment from the menu.
- Destination: type dinosaur nat. From the list of results, select Dinosaur National Monument.
- Date: 07/28/2018. We are staying in Moab for three days so our departure needs to be later than the default next day.
- Waypoint Charger Selection: Auto.
- Touch Calculate.
By choosing Auto for the charger selection, EVTO will re-estimate the entire trip balancing all of the charger needs and insure we can get to our existing and new destination in the most optimized manner. Our trip is now complete and we are ready to adventure across California, Nevada, Utah and Colorado on an epic road trip.
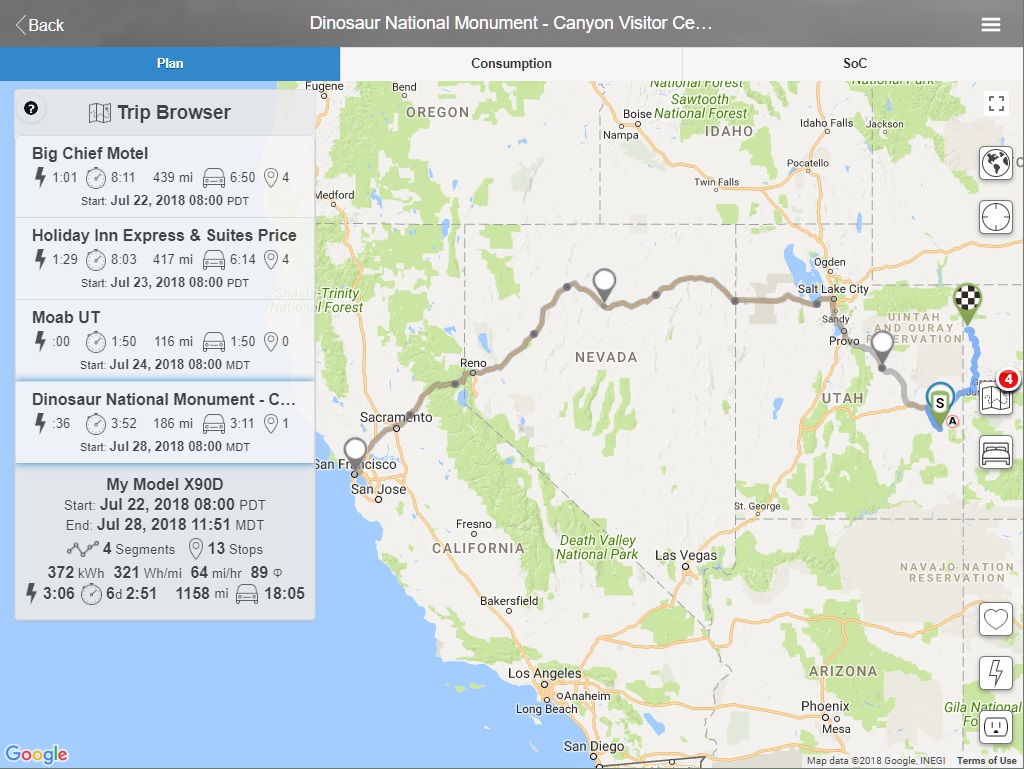
Our final road trip with all four segments
Wrap-up
EVTO is a very effective tool for multi-day trip planning, especially on mobile devices. Its use of specialized algorithms for local weather impacts, tailoring conditions for each travel day and aids to assist you in determining not only how to get there but where to stay are unparalleled.
We have demonstrated how to easily plot your trip, how to decide how far you can travel each day within your comfort zone, a means to easily segment your trip into separate day trips and how to extend your trip if your plans change.
Be sure to review all of the EVTO website content when you get a chance to increase the effectiveness of your use with EVTO in trip planning.
Loading the Tutorial Trip
You may see the final results of this tutorial within EVTO by importing this trip. Follow these instructions:
- Go to Settings and verify or change the region to North America
- Go to My Cars and verify or set the features for the car you will use on this trip. Note we built the trip with a MX90D.
- Go to Current Trips and select the Import menu item
- Enter the trip ID of to71hy3hnj97qi3k5z17dr and the PIN as 1234.
- You will be warned that if you want to share the trip you will have to make a copy first.
- Select the newly loaded trip and it will open in the Plans panel
- Select Edit Trip from the menu and change the date to a date you would be interested in taking the trip.
- Select Save.
Got an idea for a tutorial? Let us know!