Route Planning: A One-day Scenic Drive
Create a simple excursion that starts and ends at the same location.
The Big Picture
Need to run some errands? Feel the need to do some sightseeing? If you’re just out for a series of quick stops before returning home, here’s a simple way to create a local round trip returning you to your starting location, while keeping an eye on your predicted power requirements.
1. Plan a New Trip
- Select Plan a Trip from the main menu.
- For the Origin, enter your starting address. Let’s plan our round trip from the Tesla factory in Fremont CA. In Origin, enter 45500 Fremont, then select the Fremont CA result from EVTO’s list of suggestions.
- For the Destination, enter the same address you entered in Origin. In Destination, enter 45500 Fremont, then select the Fremont CA result from EVTO’s list of suggestions.
- For Waypoint Charger Selection, choose Manual.
- Select Calculate to create the trip.

A trip to nowhere?
We now have a trip that starts and ends at the Tesla mothership, going exactly nowhere. Let’s fix that by inflating the trip with some waypoints.
2. Add Waypoints
- We’ll begin our trip by heading west to the Presidio in San Francisco. Select Add Waypoint from the menu, then enter Presidio into the address field. Select Presidio, San Francisco from the list. Touch Save to add the waypoint to our trip.
- Touch the globe button to show the route. Nothing to get excited about yet.
- Next, let’s head down the coast to get some lunch in Half Moon Bay. Select Add Waypoint from the menu. Type Sam’s Chowder House, then select the location on Cabrillo Highway in Half Moon Bay. Let’s allow an hour for lunch by setting 1:00 in the Minimum Stop Time field. Touch Save to add the waypoint to our trip.
- After lunch, let’s head to the Santa Cruz Beach Boardwalk. Select Add Waypoint from the menu. Type Santa Cruz Beach, then select Santa Cruz Beach Boardwalk from the list. Let’s allow 2 hours at the Boardwalk by setting 2:00 in the Minimum Stop Time field. Touch Save to add the waypoint to our trip.
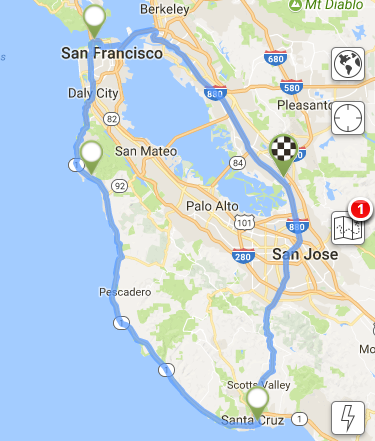
To see an overview of the entire route, touch the globe icon on the Plan screen. You should see the Big Picture at the beginning of this tutorial.
3. Review Your Itinerary
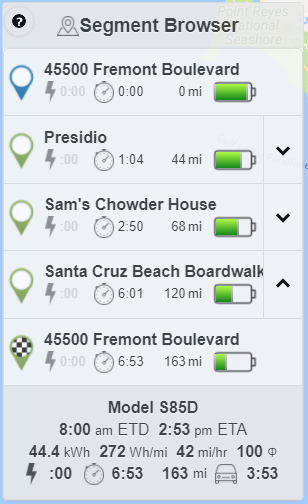
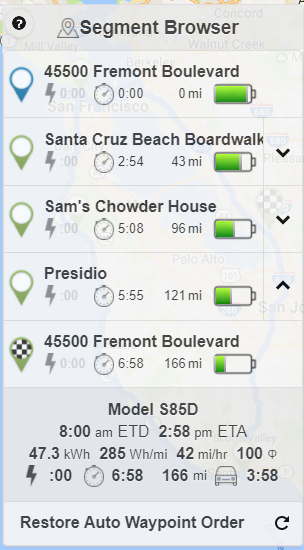
Let’s review our itinerary. Select Segment Browser from the menu to review a list of our waypoints and key metrics. EVTO reports that our excursion is about 163 miles, and should require less than 50 kWh.
4. Preview Our Final SoC
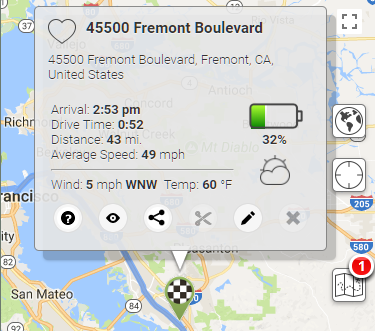
- Touch the checkered pin to display the Waypoint Inspector at our destination.
- For our car configuration and predicted weather on the day of our sight-seeing tour, EVTO predicts that we’ll return with 32% in the tank.
Enough to make it all the way
5. Preview Charging Options
Just in case we take a few side trips along the coast and need a quick charge on the way back, let’s take a look at where our charging options are located.
- Touch the lighting bolt symbol to overlay Tesla charger locations on the map.
- No surprise, the Bay Area has lots of supercharging options.
6. Do a Flip-Flop
Just for the heck of it, let’s have EVTO reverse the route.
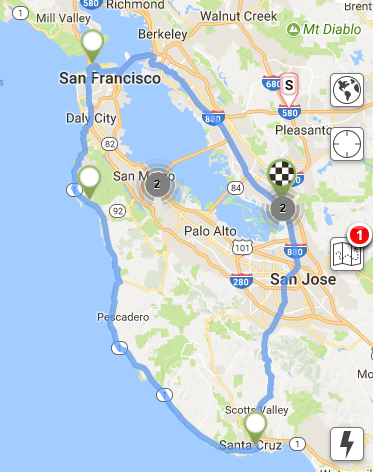
- From the menu, select Reverse Route.
- Select Segment Browser from the menu to review a list of our reversed waypoints.
- Note that a new button is added at bottom of the dialog, Restore Auto Waypoint Order. This button appears anytime that you manually change a segment’s waypoint order.
Reversed route
Well, there you have it. A nice, leisurely excursion along Highway 1 with no range anxiety.
Loading the Tutorial Trip
You may see the final results of this tutorial within EVTO by importing this trip. Follow these instructions:
- Go to Settings and verify or change the region to North America
- Go to My Cars and verify or set the features for the car you will use on this trip. Note we built the trip with a MX90D.
- Go to Current Trips and select the Import menu item
- Enter the trip ID of hd9wnrc0x0weeyx16ke5xu and the PIN as 1234.
- You will be warned that if you want to share the trip you will have to make a copy first.
- Select the newly loaded trip and it will open in the Plans panel
- Select Edit Trip from the menu and change the date to a date you would be interested in taking the trip.
- Select Save.
Got an idea for a tutorial? Let us know!